HOMEABOUT MERESUMETUTORIALSMY FAVES

Friday, November 7, 2014

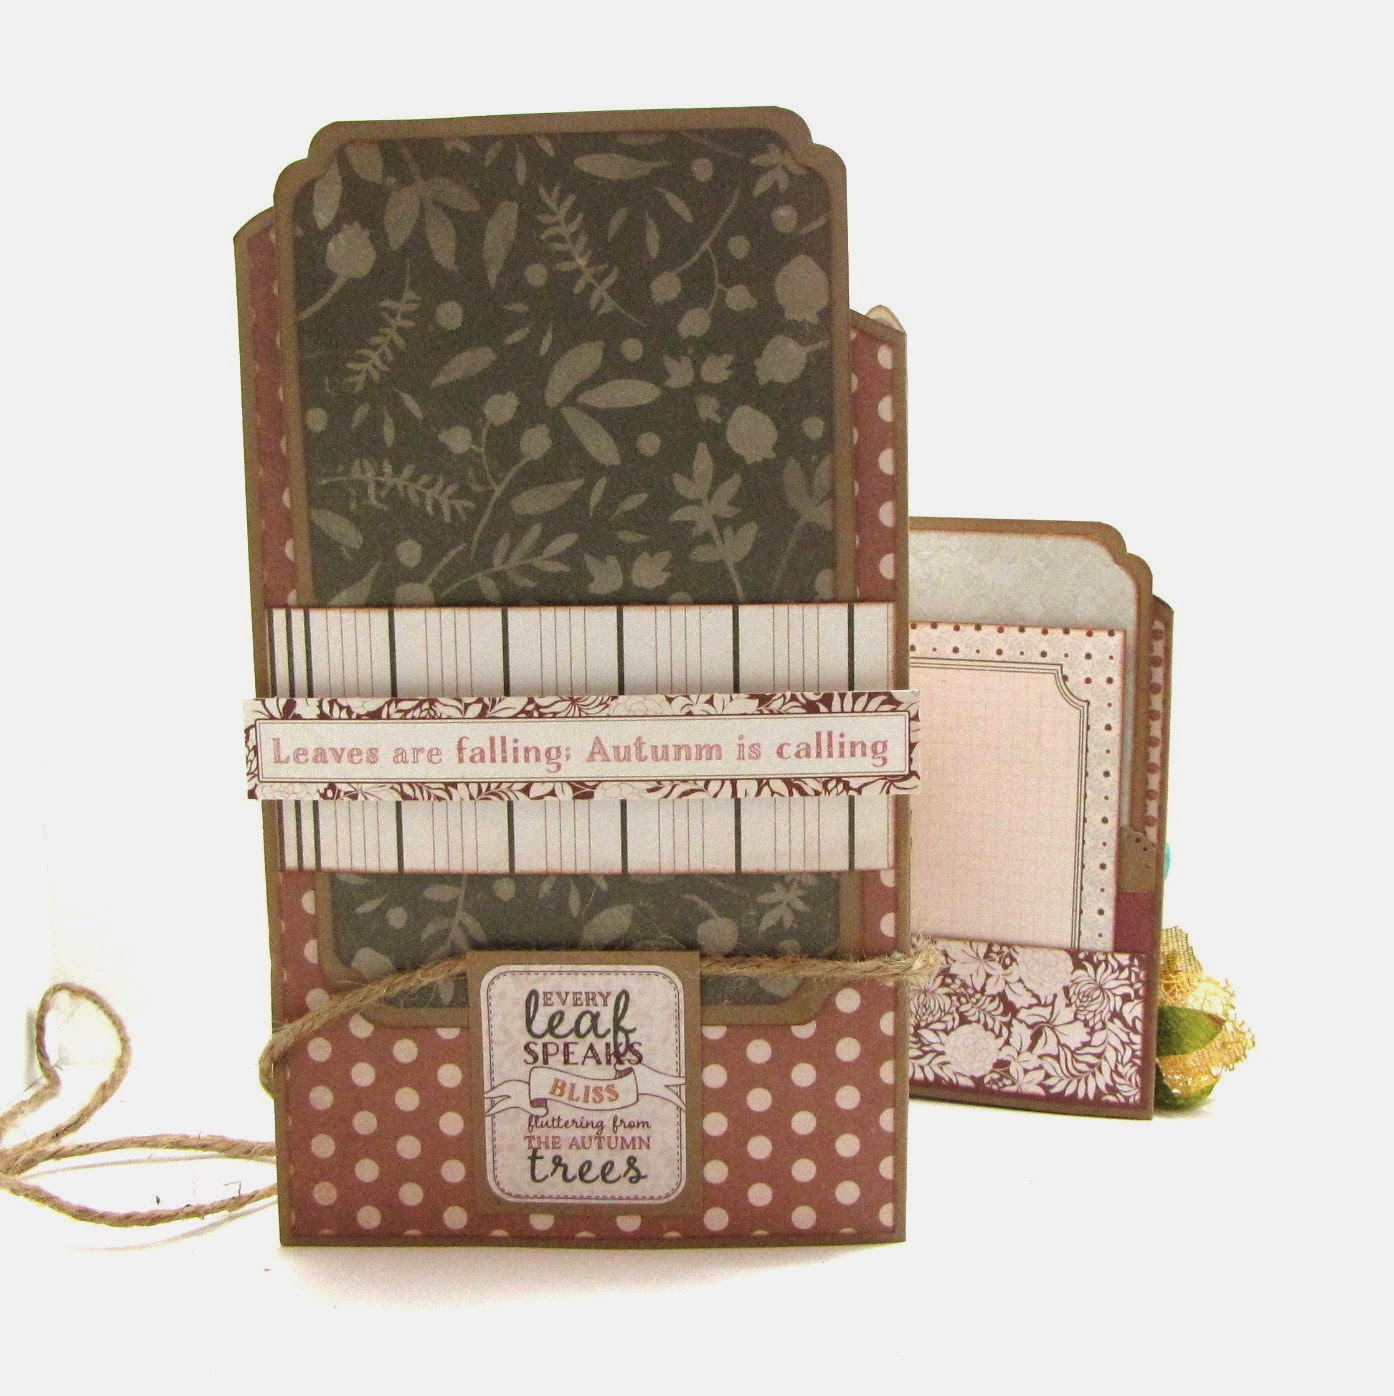
An Autumn Wavy Zig Zag Mini Album

Hello fellow crafters!  I'm way overdue for a post--I have several projects to show case--I just have to make the time to create the post. 

So let's start with this recent project that I created for Authentique where I used one of their newest collections 'Grateful'.  This collection is full of rich earth tone colors that represent Autumn as it's best & also the Thanksgiving holiday.  For this mini album I steered away from the Thanksgiving concept & made it more towards an Autumn themed mini.

This style of mini album is called a Zig Zag mini album.  I found a wonderful tutorial for this mini by My Creative Spirit on YouTube.  You can find her tutorial here. I followed her tutorial fairly closely & the main difference was on how I created the top edge of the mini since I used a mini border by Kiwi Lane to give it a 'wavy' border.


The bright orange organza star flower & the smaller white & yellow ribbon flower are items from my own stash.  You can find these & several more in different colors for sale in my Etsy shop The Kreative Korner.


A piece of burlap string keeps this mini closed.


Here once can better appreciate the 'wavy' border of this mini.  I used the Mini Madison Ave template by Kiwi Lane Designs to create this border.


This mini has double pockets on both sides which I've filled with photo & journaling inserts in different sizes. This mini can hold 2" x 2", 3" x 4" & cropped 4" x 6" inch photos.  The number of photos it can store depends on how the journaling cards are used.  They can be used as both journaling and/or photo mats.  


Here's the back of the mini. I created a belly band where you can slip a large photo mat. As a stopper for the photo mat, I'm using a sticker from the elements page that come with the 'Grateful' collection. It's only adhered at the bottom so the photo mat can tuck itself right inside.

This mini album is available for sale at my new Etsy shop The Kraft Nook.  If interested, feel free to visit my shop here.

To go along with this mini I created a brief video to show all the different journaling cards, photo mats & pockets this mini album has.

Supplies: Paper - Authentique, Stickers/Embellishments - Authentique, Templates - Kiwi Lane, Flowers - Petaloo, Kay's Kreative Korner, Other - Burlap String, Stick Pins

Thanks for stopping by & enjoy!


Photobucket

Thursday, October 2, 2014

My Little Pumpkin Layout


Halloween is just around the corner (if you can believe that) & let's not even talk about Christmas!  Besides all of the retails stores are doing the talking for us.  Lately, all the stores I walk into are a Christmas wonderland already.  How time flies!

This page is one that is long overdue.  This is my son celebrating his very first Halloween which was last year.  I dressed him up as a little lion & went to town with my camera.  :-)  I'm not sure yet what he'll be this year--am still giving it some thought.

All papers used are by Authentique's newest Halloween themed collection titled 'Spirited'. 
Once again, I based my design on a fabulous sketch from Page Drafts.  What fabulous sketches--I can't help but use these sketches as much as possible in my work.


Watercolors!  Another new adventure for me!  I'm starting to slowly start playing around with them & I'm very much enjoying the effects.  For this page I used pearl watercolors in soft hues of orange & purple.


This glitter spider I found at my local Michaels.  When I saw them, I knew they'd make for a cute embellishment to a Halloween themed project.

I added splatters of black mist to my background & created random coffee stains with the use of a Crafters Workshop stencil (conveniently called 'Coffee Splotch') .


As is a tradition with my layouts--I included journaling.  It's stored in a pocket that I tucked behind my two photos.


These hinges are part of the sticker collection that come with 'Spirited'.  They fit right in with the design of my page.  It almost looks like these two hinges are holding my layout together. 


After making this layout, I officially decided that I need to do more fussy cutting!  I love, love, love how my little guy looks in this cluster.  I hardly ever cut my photos out from their backgrounds--but I think I need to do this much more often!

Supplies: Paper - Authentique, Flowers - Kay's Kreative Korner, The Felt Shoppe, Embellishments - Authentique, Bling - ZVA Creative, Mist: Heidi Swapp, Stencil - Crafters Workshop, Other - Doilies, Watercolors Spiral Clips, Glitter Spider

Thanks for stopping by & enjoy the rest of the week...

Photobucket

Friday, September 26, 2014

Colorful Ribbon Wreath


Today I'm sharing my very first ribbon wreath!  I've seen several of these on Pinterest & decided to give it a try--I'm very happy with the end results.  I now have a colorful decoration in my craft room & best of all, I got to use up a ton of ribbon scraps & ribbon in general!

This wreath was made for the promotion currently going on over at the Authentique blog with both Imagine Crafts & May Arts.  All the ribbon seen here is by May Arts.

To further decorate the ribbon wreath--I added some handmade embellishments.  I used papers from Authentique's 'Harmony' collection to die cut a couple of flowers with the use of the 'Tattered Florals' die by Tim Holtz. 

The bird was fussy cut from one of the 'Harmony' papers (Spirit). 


All the embellishments had their edges inked with Midnight Chalk Ink by Imagine Crafts in order to make them 'pop' more.

Here's a close up of the wreath. As you can see there were many, many strips of ribbon used.  As a filler I used a couple of strips of tulle from my own stash in orange, yellow & gray.


This ribbon wreath can be a bit time consuming but it's worth the effort.  Also, it's a fairly easy project to make.  Here are some tips on how to make your own ribbon wreath...

Thursday, September 18, 2014

Pop Up Card Tutorial

Pop up cards is something that has been around for a very long time.  I remember creating these in arts & crafts class in grammar school.  It was because of these fond memories that I decided to revisit an old favorite & create a classic pop up card.  These are easy to create & give your cards a nice touch of dimensional interaction.

Onto the tutorial...

Wednesday, September 10, 2014

The Magic of Books Layout Berry71Bleu September Challenge

It's my turn once again over at Berry71Bleu.  This months theme is: The Things We Love.  You can find the full details of this months challenge here.

This month's challenge is being hosted by our very own Marivic Clifton. I have countless of things that I enjoy or love--usually it's the little things that bring the most joy.  So I had a bit of thinking to do.  In the end I decided to base my project on my love for books--in particular the Harry Potter series.

For someone like me who's had an active imagination ever since I was a child--these books were heaven sent!  Growing up I was intrigued with shows like 'Bewitched'--how wonderful would it be to just wiggle your nose & have wishes come true!  So when Harry Potter came along it introduced my imagination to a whole new world full of magic, unforgettable characters & amazing creatures beyond my wildest dreams.  These books gave me an amazing journey & I didn't even have to really go anywhere! :-)  I hope to one day pass these books on to my son whom I'm hoping will inherit my overactive imagination & enjoy them as much as I did.
Here's the mood board created by Marivic--it's full of several items that many of us can say we love. I'm especially eyeing that pink cake.  Oh yes, sweets...I have both a weakness & love for them!
My design is based on a fabulous sketch by Page Drafts.  It's always a guaranteed mojo jump start with these sketches!
 My thoughts are stored in a scroll which is one of my favorite ways to store journaling.  It gives me lots of room to write down thoughts & memories plus makes for a unique embellishment on my page.  I have a tutorial on how I make these scrolls here if interested.
 To make the stars I used a stencil by UmWow Studio & modeling paste.  I further dressed up my background with random dots of Stickles, stamping & mists.

 Check out Hedwig in his little cage!  I bought this Harry Potter paper pack & coordinating embellishments many moons ago--aside from another Harry Potter page found here--this is the second time I get to use them.  My favorite are the embellishments!  The Nimbus 2000, the frames, the lightning bolt...so many symbols that represent the books--if you're a Potterhead like me--you can relate!


Supplies: Paper - Creative Imaginations, Stencil - UmWow Studio, Embellishments - Creative Imaginations, Flowers - Prima, Kay's Kreative Korner, Glitter Glue - Stickles, Stamps - Sodalicious, Prima, Other - Modeling Paste, Spiral Clip

Don't forget to swing by the Berry71Bleu blog during the rest of the month in order to see the design teams take on this months challenge.  As always--play along if you can--there are several fabulous prizes up for grabs!

Thanks for stopping by & enjoy the rest of the week!

Photobucket

Tuesday, August 12, 2014

Heartbreaker Layout Berry71Bleu August Challenge


Good afternoon fellow scrappers!  I'm up on the Berry71Bleu for the month of August.  For this month the challenge is simply to follow a sketch created by fellow DT member Sandra Przybylska.

This little 'heartbreaker' is my son at about 6 months of age.  He's wearing one of my husband's baseball caps.  This particular photo is one of my faves where the hat fell to the side of his head & he's peeking out from behind it with one eye!  :-)
Here's the sketch provided by Sandra. It's simple but very versatile.  The elements can be interpreted in so many ways.  Take this sketch & make it your own!
 I've included many embellishments, bits & bobs that go with the theme of this page.  I wanted a couple of embellishments such as the yellow elephant to represent him as a baby & the more masculine embellishments such as the bow tie & mustache is to represent the 'little man' he's growing up to be.
 Here's a close up of the the steampunk hot air balloon chipboard by Creative Embellishments.  All of the paints & mediums applied to the chippie was done with my finger.  I've been without a scrap room for over a month right now since it's being renovated & I didn't have any brushes of any kind available to me.  I'm currently scrapping out of my dining room & have access to a limited amount of supplies...so finger it was!

I first applied a coat of white gesso, followed by red acrylic paint.  I finished it up by adding a coat of transparent glitter paint & crackle paint.
 Layering several elements has lately been my go to technique.  Punchinella is slowly starting to become one of my fave background elements.  I've used a piece of bright red punchinella in the background of all my layers & I love the effect it adds as it peeks out from underneath all the layers.


Supplies: Paper - 7 Dots Studio, Chipboard - Creative Embellishments, Embellishments - Chantal Vandenberg, Freckled Fawn, Punchinella, Panda Eight Designs, Flowers - Prima, Kay's Kreative Korner, Other - Mini Wooden Fence, Sequins, Doily

Thanks for stopping by & don't forget to visit the Berry71Bleu blog & play along with this month's challenge for a chance to win one of several fabulous prizes that are up for grabs!

Enjoy the rest of the week...
Photobucket

Wednesday, July 30, 2014

You Color My World Mini Album

This colorful mini album is one that was made several months ago as a DT assignment for Authentique.  This little album measures approximately 3 1/2" x 3 1/2" inches & is ideal for storing wallet sized or 2" x 2" photos.

I've used papers from Authentique's 'Renew' collection. This mini album was made by using the meander technique.  There are countless of tutorial on YouTube & on the internet on how to go about making this type of mini album.  This was a first for me & I found it to be a very quick & easy way to create a base for a mini album.
The cover is a combination of sticker elements that I bought at my local Michaels and a color wheel stamp by Sweet Stamp Shop.  The easel  was an embellishment by Jolees..it has an actual canvas texture.  I applied a couple of alcohol ink drops directly onto the canvas.  This gave the illusion of paint splatters on the canvas.
The design of the meander album was altered slightly.  I added tags to all the pockets & created a few pages towards the center of the album that flip open & reveal more space to store additional photos.
Since I added additional flip pages to this mini--it ended up being a thick mini--but it can be tied closed with the ribbon & it's a really cute way to store pictures of kids, grand kids or even pets.  Since it's a small album, it's also convenient to carry around in a purse or tote.
The color wheel is an interactive embellishment.  You can spin the upper level of the wheel--I thought this would add a nice touch to the whole 'color' theme of the mini.

Supplies: Paper - Authentique, Stickers - Authentique, Jolees, Stamps - Sweet Stamp Shop, Ribbon - May Arts
Photobucket

Monday, July 14, 2014

A Blog Hop With A Difference!

Hello once again fellow scrappers & crafters!

So now I'm wondering what happened to the month of June?  I just now realized that I only posted once this past month.  June seems to have gone by in a blur.  Maybe it's because many things happen in this month.  For one, June is my birthday month.  So I spend at least one full week (at a minimum) milking my birthday!  So that means, lots of trips, outings, restaurant requests, NYC trips, craft binges etc...everything & anything that makes me happy!  Then it takes me at least another week to recover from my birthday bash.  There's a method to my madness--there really is!

The other thing about June is that it marks the middle of the year.  Six months for 2014 are behind me & I'm prepping for the next 6 months which to me, are my fave.  In these next 6 months there's the wonderful season of Autumn & along with Autumn come the pumpkin lattes, muffins, cakes and everything else pumpkin--which I love! Of course we have Christmas & the welcoming of a New Year--but let's not get ourselves TOO ahead here.

The wonderful Emma Stafrace asked me to participate in this blog hop which I found to be different from the usual blog hops.  Those who know me well know that when something different comes along I jump at the chance to participate!

Emma is such an inspirational & creative artist.  She's the mastermind behind the design of my blog & is also the owner of Page Drafts which houses a countless number of sketches that jump start my mojo every single time I visit. What always amazes me about Em is how she can create a beautifully detailed digital image & then recreate it flawlessly in either a hybrid or traditional layout.  That's talent that requires recognition!  If you're not familiar with her work--well then, what are you waiting for!?  You can find all her amazing designs on her blog 'Just a Girl With Ideas' right HERE.

So Em is quite an inspiration for yours truly--which is why I was floored when she asked me to participate as one that inspires HER.  :-)

So the idea behind this blog hop is to share a little bit about myself & my creative process & then to introduce people that inspire me.  Some of the ladies I picked may be familiar to you--others may not--but that's the idea of this blog hop.  To spread that creative love & inspiration.  At the end of this post I have listed the three ladies that inspire me--I'm sure you'll find them as creative & inspirational as I do.

So let's get to know me a little bit better shall we?

What am I working on right now?
My life is split into many different activities.  My full time job as a Quality Analyst takes up most of my day hours.  The afternoons are split between going to Zumba and shaking my bom-bom, to spending quality time with my family.  My evenings are usually my quiet time & when I work on either DT assignments or items for my Etsy shop; The Kreative Korner.  I'm currently on two design teams--Authentique & Berry71Bleu.  I'd love to be on more DT's but my schedule just doesn't allow for it.  Lately I've been experimenting more with Photoshop.  An example would be my last page 'The Breakfast Club' where I added myself to the 'Breakfast Club' ensemble as 'the rebel'.


How long does it take to create a project?

I used to take 2-3 evenings to create a project a few years back--although I believe this was because I was finding myself.  I experimented with many different styles, techniques & approaches--I believe I'm finally at a point where I'm comfortable with my style & I can now usually complete a project in a few hours; 2 to 3 hours tops. Also, my mojo has to be with me.  If my mojo isn't up to par then I can start a project--but I'll never finish it.  It's all abut the inspiration for me--to have that light bulb go off in my head and then work from there.

What are my fave things I love to create with at the moment?

Lately it's been all about layers, layers & layers paired with lots of bits & bobs.  Little unique trinkets that I can place into any cluster are my fave such as flair buttons, dominoes, spiral clips, game pieces...anything that's small & different. 
 Layers galore!  I love using multiple photos in my work & layering those as well. 
 Flowers, trinkets, buttons, arrows...lots of bits & bobs tucked in every corner.

 
How does your creative process work?
 This is a hard question because I don't seem to have one set process.  If I have to work with a determined set of supplies (like I do for my design teams) I usually let the material I'm working with determine the photos & theme of my page. If I'm free to use anything from my supplies--then I let the photos choose the theme, colors & design of my page.

How do I become inspired?

Inspiration for me can come from anything.  From sitting in my cube at the office & staring at the design of the rug to standing in line at the grocery store & admiring the design on the shirt of the person standing in front of me.   It literally comes from everything & everyone around me.  My son who is currently 20 months old is the one who most inspires me.  The faces he makes, his emotions, his reaction to new things, his desire to explore & learn--I take it all in & then try to express it via my work.

This clock was created when I kept thinking to myself how I wanted my son to stay little forever.  So I framed him into this clock.  The concept of 'capturing a moment in time' drove the inspiration behind this altered Tim Holtz clock.

What is my signature style?

I've been asked this question many times & can never really give a great answer.  I can't say I have one set style.  I can fluctuate depending on my source of inspiration, mood & amount of time I have to create a project.  There are two things that I tend to include in just about all my work--I usually include multiple photos in my projects & every single one of my pages has some form of journaling.  I use my layouts as my diary.  So it's essential for me to include dates & thoughts about the subject of my page so I can capture the specific memory & then pass it down to future generations.

Following are the three ladies that inspire me.  I'm sure you'll find them as inspirational as I do...

Lisa Griffith

 Lisa caught my eye when I visited her blog to comment on an entry for Berry71Bleu.  I immediately loved her style & I noticed right away that she has an amazing artistic eye.  The designs of her pages just 'flow' & she has the ability to add mixed media to her backgrounds without over powering the primary subject of her page.  Whether she decides to keep her designs simple or complex--the end result is always beautifully thought out.  You can see all of her fabulous creations on her blog 'The Paper Attic'.

Melenia Agapides

I first met Melenia while on the Once Upon A Sketch (OUAS) design team.  I've always admired her ability to flawlessly incorporate a number of different mixed media elements to her pages.  Melenia also has the ability to add multiple layers of a variety of different elements without the elements looking 'cluttered'.  They all come together just right & compliment each other perfectly creating a harmonious accent to the main theme of her pages.  You can visit Melenia on her blog 'A Room Full of Colours and Shapes'.

Athanasia Papantoniou

I met Athanasia on the OUAS design team as well.  I just love Athanasia's style. She can go simple or she can get fancy--any style she takes, the end result is always a feast for the eyes.  She's amazing with bright colors. Athanasia will have a bright colored background & then know exactly how to tone it down with the use of mixed media, stencils & stamps.  She also has several off the page projects such as wreaths & clay houses--you just have to check out these adorable clay houses--they're miniature works of art!  You can find Athanasia on her blog 'Athanasia: Me and Myself'.

Thanks for stopping by & I hope you enjoyed learning a bit more about me & that you discover new inspiration by visiting these three ladies.

Enjoy the rest of the week!
Photobucket