HOMEABOUT MERESUMETUTORIALSMY FAVES

Friday, February 22, 2013

My Sweet Little Lamb Layout


Good evening fellow scrappers!  Today I bring to you my debut page for Authentique!  I was very much looking forward to working with their wonderful products--Authentique is known for their thick heavy weight paper & I utilized this characteristic to create some very simple handmade embellishments in the form of paper scrolls.  Before I go on any further though--just a bit about the theme of this page.

This would be my newborn son at approximately 1 month & 1/2 of age wearing his very cute lil' blue elf hat.  These photos were taken in December of 2012 & I remember that day vividly.  He was actually quite the tiny cranky pants that day because we decided to take pictures of him too close to his scheduled dinner time.  You can see the poutiness creeping up on his face--needless to say we kept this photo shoot short--but did manage to take a few pics--this being one of them.

For this page I've used Authentique's Hope Collection.  This collection is geared towards Easter but I wanted to show that these papers can be used for other themes as well.  In fact, they work perfectly for masculine/boy themed pages.  I chose bold embellishments that would bring out the primary colors of the Hope papers.

The large silk light yellow flower shown here is from Funtoolas Etsy shop.  There are many more lovely fabric flowers in this shop along with a few other crafting embellishments in this shop if interested.

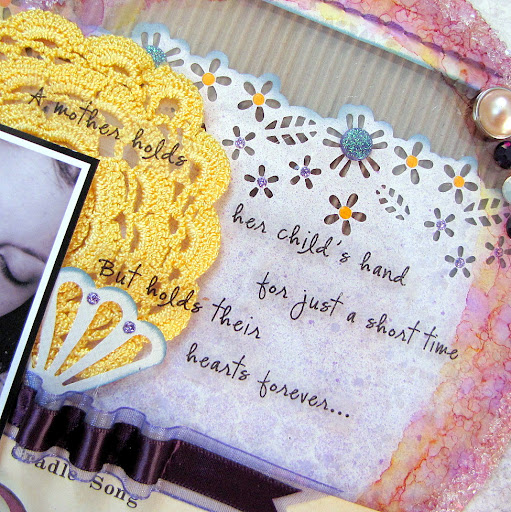
I found this quote online & found it to go along nicely with my page.  I found it to be so very true & printed the quote directly onto my photo.

The banners are cutouts from a Hambly Print overlay...the resin domino pieces are embellies from my stash--if I remember correctly, I found them in the clearance bin at my local Michaels--they're actually considered beads since they have holes in them & you can run string through.  Personally, I saw them as really cute embellishments for scrappy projects!


Sometimes, the best embellishments are the paper themselves & with the simplest of techniques.   Authentique's paper has a perfect thick texture to them in order to create sturdy paper scrolls.  I've taken several pieces from the Hope collection & have rolled them to create random scrolls onto my page.  These little rolls of paper make for an interesting visual embellishment on your layouts & are also a great way to use up leftover scraps.  I've spread several of these scrolls throughout my page & have made them in different sizes.  When adhering these paper scrolls, try not to adhere them in any particular order--just randomly adhere them & you'll notice that this looks more visually appealing to the eye.

Take a closer look at the third scroll from the bottom. This scroll also happens to be my journaling.  Storing journaling on scrolls has become almost a trademark on my pages.  TIP: This is a great way to store large journaling or stories without taking too much space on your pages.  I typed up my journaling on my computer & printed it onto vellum--then I rolled it up & adhered it to my page with a leftover strip of scrap paper that I use to keep my scroll in place.

If interested on how I go about making these scrolls--feel free to check out the tutorial here.  


Isn't this the cutest fuzzy teddy bear embellishment?  I bought several of these in different colors.  I find them to be the perfect embellishment for baby themed pages!

These are the my latest butterflies & will be added to my small Etsy shop very soon.  To see more butterfly embellishments--feel free to visit my shop here.

More paper scrolls, strategically placed onto the background of my layout.


The majority of the embellishments used on this page are from Hope's Details & Statements sticker elements. If your scrap approach is anything like mine, you tend to arrange & re-arrange the many embellishments on your page at least 101 times!  So being able to freely move sticker elements around without worrying about them sticking to your page adds flexibility during your page design.  TIP: Something I tend to do with sticker elements is to stick them onto transparencies.  This way I can cut them out & then adhere them anywhere onto my page without having to worry about making a mistake as to where I place my stickers.  If you wish to eliminate an extra step, Authentique's DT Coordinator, Emily gave me yet another tip.  Sprinkle a bit of baby powder to the back of the stickers to remove the stickiness.  Either way will work!

So all of the stickers seen on this page have been adhered to transparencies first, cut out & then adhered with your basic glue or pop dots to my page in order to give them more dimension.

As always, many thanks for those of you who stop by for a visit.  Enjoy the rest of your weekend!


Photobucket

Tuesday, February 19, 2013

No Ordinary Love Layout


Hello once again fellow scrappers!  Today I'm presenting my interpretation of Anupama's 'White Space' challenge going on over at Berry71Bleu.   'White Space' is defined as a portion of a page left unmarked in visual arts.

I decided to leave two sections of my page as white space--the upper right hand corner & lower left hand corner.

I've used papers & a few embellishments from Kaisercraft's Forget Me Not collection which coordinated quite well with Marivic's Berry71Bleu tag.

This would be me with my fur baby Toby.  I decided that Toby was due for a page.  Even though my first son has arrived to our home --I still see Toby as my eldest 'son'.  :-)  Yes, I know he's a dog--but to me he's simply a child trapped in a pup's body.  He taught me the meaning of unconditional love & he's still a very important member of the family.

It took Toby about 2 weeks for him to get used to this tiny little human in the house.  He's been an only child for five years & had never seen a baby.  So it was a big adjustment for him.  After 3 1/2 months, Toby has pretty much adopted his less furry younger brother & protects him as if he were his own.

What I have with Toby is 'No Ordinary Love'--hence the title.  It's the kind of unique love that can only be shared between man & his best friend or in this case, between a girl & her little fur baby.


I did much layering on this layout with foam dots & pop dots in between several of the layers in order to give my page a bit of dimension.


Of what has become a sort of tradition with my pages--here's my journaling stored in the form of a scroll.  As mentioned in previous posts--I love attaching lengthy journaling and/or story telling to my pages.  I used to always store them behind my pages because since they were so long--they would take up a lot of room on my layout.  However, ever since I started storing my journaling in the form of a scroll--it's become almost a habit of mine & a trademark on my pages.  Plus they also make for a really cute & unique type of embellishment!

If interested on how I go about making these scrolls--feel free to read up on a tutorial I made for them here.

I love this photo that my husband took of me & Toby.  As usual, he looks as if he's smiling at the camera!  Right next to my photo is a mini glass vial that I filled with seed beads from my stash.


This is my latest fave die!  I love, love, love this hot air balloon die by La-La Land Crafts!  Isn't it so very cute!  It adds a brilliant touch to my layouts.


Finally, here's a closeup of Marivic's Berry71Bleu tag.  These tags are like instant embellishments.  You don't have to dig around your stash for too many embellishments if you have one of these tags handy.  Just adhere them to your page & you're pretty much done!  You can find more of Marivic's tags in her Etsy shop here.

As always, a big thanks for those of you who stop by for a visit.  Make sure to play along with this month's Berry71Bleu WhiteSpace challenge if you can!  There are some fabulous prizes up for grabs by UHK Gallery & 7 Dots Studio!

Enjoy the rest of the week!
Photobucket

Friday, February 15, 2013

Your Everything Layout


Hello once again fellow scrappers! Happy belated Valentine's Day to you all. I hope many of you gave & received much TLC to all your loved ones yesterday & every day! Why just keep it to just one day right? Spread the love daily is what I say! :-) On that note--this page is a bit on the romantic side.

This would be me & my husband on our wedding day.  I titled this layout 'Your Everything' which is the song that was playing when this photo was taken.  My husband requested the DJ to play this song by Keith Urban & then proceeded to dance & sing it to me.  It came as a bit of a surprise since I didn't know he was going to ask for this special request.  This would be my husband at his best!  :-)

This page was made with two products that are part of Clear Scraps newest releases--the Hearts Acrylic Border & the 6" Chicken Wire mascil.


This large sheer organza ribbon is actually two bows that I hot glued together in the form of a cross.  So it looks fancier than what it really is.

Underneath it is a Prima vine that I tore apart & adhered strategically underneath it.


All papers & the stamped images are by My Mind's Eye (Follow Your Heart - Be Happy Collection). Here you can see the large floral stamped image and the honeycomb image that I randomly stamped in the bottom right hand corner.


Here's a closeup of the Chicken Wire mascil. I placed the mascil in the corners of my page & spritzed Graphite Glimmer Mist & just a hint of My Bleeding Heart Coloringz by Shimmerz over it. Next I removed my mask & LISTO! Instant decorative & shimmery background!

The large leaf flourish die is the Mega Fanciful Flourish by Cheery Lynn Designs.  I further decorated the flourish die by adding dots of acrylic paint to the ends of the swirls.

You can also see in this close up that I randomly added dots of Diamond Stickles to my background.  Adding dots of light colored shimmer adds a nice touch to your background.


Here's a closeup of the Hearts Acrylic Border.  To give this border it's texture--I first highlighted the edges with a black Sharpie Oil Based Paint Pen--then I colored the border with Red Pepper & Silver alcohol inks.  Finally I stamped the word 'love.' with black Staz On ink to the hearts.  TIP: Always remember to use solvent inks & permanent markers with acrylic.  Using any other kind of inks or markers will cause your work to smear.


The paper heart border was made with Martha Stewart's Lattice Heart deep edge punch.  I accentuated the design with dots of pink acrylic paint.


These butterflies are a fairly new addition to my Etsy shop.  They are called 'Angelus' & like all the butterflies in my shop come in sets of  3.  Although they can be made in any size!  If interested in these or any other kind of butterflies--feel free to visit my shop.

A big thanks to all of you who stopped by for a visit.  An even bigger thanks for those of you who leave a comment.  I always appreciate the gesture!

Hope you all had a wonderful Valentine's--enjoy the rest of the weekend!
Photobucket

Tuesday, February 5, 2013

Authentique DT

Good evening fellow scrappers!  Phew...it's been a bit busy this week since it's my first week back to work from maternity leave.  I've been doing much catching up at work & much adjusting.  What does this equal?  A very tired me!  However, I've finally found the time to post this announcement on my blog.

I've been asked to join the Authentique Design Team!  I was very happy, honored & grateful when asked to join--I still have a bit of hard time believing this really happened since it was during the busy holiday season.  It was unexpected--but very well received!

The announcement was posted this past Monday--I was introduced along with three other new talented design team members on the Authentique blog.  You can read the full post here.

I have to say I'm very much looking forward to this new journey--let the creativity begin!
Photobucket

Saturday, February 2, 2013

A Mother's Love Layout

Greetings fellow scrappers!  It's time for another challenge over at Once Upon A...Sketch (OUAS)!  This month's challenge is 'love' & how appropriate since February is known for Valentine's Day & love of all kinds in many parts of the world.

As mentioned in the OUAS blog--love comes in many forms.  Love for your children, love for your parents, love for your significant other, the love shared between good friends...even the love you have for your pets!

Since I recently became a mom--I based my page on the love shared between a mother & her children.  I can finally say I truly understand my own mother & her never ending concern for me.  I'm 35 years old & she still worries about me when I go out late at night or when I'm late coming home from work.  I never understood exactly 'why' since I'm no longer a child myself.  However, with the birth of my son--it all just 'clicked'.  He's barely 3 months old but the need to protect him from harm, the fear that something may happen to him, the love I have for him has no age limits.  I truly do not see myself feeling any less worried for him even when he's 30 years old.  The love a parent has for their children truly is something quite strong, unbreakable & with no limits.

So here's my take on the challenge & on Nadia's fabulous sketch!
Here's Nadia's sketch & what I based my design on.
Journaling is stored in the tag seen inside the kraft envelope.  My journaling is meant for my son's eyes only.  I hope he'll enjoy reading all of these little messages I have for him within my pages!  I've been making many of these lately...

Several images by Prima were stamped onto transparencies with Staz On--cut them out and adhered them throughout my page.  In this screen shot you see a butterfly & gazebo.
These mini spools are some of my favorite embellies!  They really add just the right little touch to these pages.  I wrapped a bit of thread around them & linked the two spools with the same thread.

The "Wild Flowers" deep edge punch by Martha Stewart was used for the border seen in the background.  I further decorated the images of the punched border with glittered brads, Lavender Stickles & acrylic paint dots.

The base for my entire page is actually a 12" x 12" Acrylic Sheet by Clear Scraps.  The corrugated board seen in this screen shot is behind the acrylic base.  This card board can be removed & the page takes on a completely different look.

I also did a bit of hand stitching along the top & bottom borders.

The flowers are a combination of mulberry paper flowers & fabric flowers.  The fabric flowers I found at my local craft store in the clearance bin for $1.00.  What a great bargain & the color scheme was perfect for this page!


The large acrylic heart is also by Clear Scraps.  This would be the XL Hearts.

I punched a couple of holes into the bottom of the acrylic heart with my crop-a-dile & thread a bit of yellow & purple tulle through these holes.  The tulle peeks out from underneath the bird's nest.
The border of the acrylic heart was colored with alcohol inks.  I used a combination of Purple Twilight & Sunshine Yellow alcohol inks.  I then spread a bit of clear dry adhesive with a thin paint brush all along the edge of the heart  & sprinkled some Diamond Dust on it.  This was the end result.  I was going to leave the heart without the Diamond Dust--but I wanted the heart to stand out just a bit more without being too over bearing--so I decided to go with the Diamond Dust.
All of the ribbon used on this page was kindly sponsored by Scrapbook Fantasies.

In this screen shot, I adhered one dark purple ribbon on top of a wider sheer lilac ribbon.  I then adhered it to my page with a bit of a 'ruffle' to it to give it more dimension.

The title is by Dusty Attic.  I simply painted the chippie with  purple metallic acrylic paint.  In person, this title has a bit of a shimmer to it.
This quote that I found online was a perfect sentiment for my page.

"A mother holds her child's hand for just a short time.  But holds their hearts forever..."

I printed the quote onto a transparency, cut it out & adhered it to my page with a bit of clear dry adhesive.

As always, a big thank you to those who stop by for a visit.  Your visit & comments are always very much appreciated.

Make sure you stop by the OUAS blog and check out the other DT's take on this challenge--& do play along if you have the time!

Have a great rest of the week.
Photobucket