Hello once again! Kay here with a mini album made with the fabulous 'Pride' collection by Authentique. Even though this collection is designed for Independence Day I wanted to show that it can be used for other themes. What came about by accident was the design of this mini. When I finished it & showed it to my husband, he was the one who pointed out that when the mini is closed it actually looks like a little firecracker. The way the tulle puffs out on the top imitates the sparkles of a little firecracker. So conveniently enough, this mini 'Firecracker' album reflects it's own name.
As many of you most likely know there are many, many tutorials out there for mini albums--so I guess I'll be adding to this collection! We all have our own take on shared techniques--so this would be mine. This little album holds a total of 8 tags that I've used to mat 8 photos of my son when he was about 2 months old. Each tag was made with Core'dinations cardstock from their Whitewash & Tim Holtz Kraft-Core collections.
I strung different colored tulle onto each tag to make it easier to pull the tags in & out. You can put journaling behind each tag or you can even add another photo on the backside of the tag for a total of 16 photos. The banners seen on each pocket were cut from leftover 'Pride' scraps by using one of the sticker banners that came with the Pride collection as a template. I just added a bit of rub ons & dots of clear Stickles to decorate them a bit more.
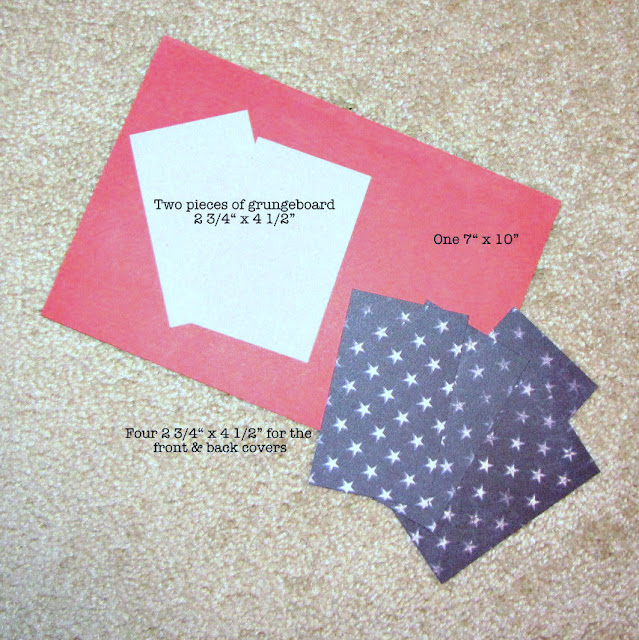
Step 1: You're going to need one 7" x 10" & four 2 3/4" x 4 1/2" inch pieces of pattern paper. For the covers you'll need two pieces of grungeboard or corrugated cardboard. Basically anything that's a bit sturdy that can be used as a cover measuring 2 3/4" x 4 1/2". I used grungeboard for my covers.
Step 2: Score your 7" x 10" paper on the 10" side at 2 1/2", 5" & 7 1/2" inches. Then on the 7" side score at 3" inches.
Step 3: Crease your score lines. Fold accordion style across, then fold the bottom shorter half up. This is the base for your mini and you've just created four pockets which will hold your tags. NOTE: You can either stop here or if you want to have more tags/pockets then repeat Step 2. I wanted my mini to hold more photos so I made two of these accordion pocket fold outs.
Step 4: This step is also optional. If you want to add patterned paper to the base of the tag pockets you will need to do so at this step. Just cut out four 3 3/4" x 2 1/4" pieces of patterned paper and adhere to the four pocket backgrounds.
Step 5: Here's what your base should look like if you decide to add patterned paper to the background. Now you're going to start adhering your paper in order to form the pockets. With either glue that has a thin nozzle or with 1/8" 2 sided tape, adhere where I've drawn the arrows. Your glue has to be thin or else you'll end up with tight pockets. I prefer the 1/8" 2 sided tape but I didn't have any on hand. GASP! So guess who ran out 2 days later and bought herself 1/8" 2 sided tape? :-) When done applying your glue, just fold up and make those pockets.
Step 6: Next are your covers, These are fairly simple...just adhere pattern paper on both sides of each cover and you're done! The papers are the same size as the cover and I inked all the edges to hide any white spots from the grungeboard or papers.
Step 7: If you decided to make two of these accordion pocket fold outs then this step is for you. To join your two bases just cut a piece of paper (preferably from the same paper you've used on the base of your mini) measuring 1" wide x 4" high & fold in half.
Step 8: Adhere one base to one side of the fold and adhere the other base to the other side of the fold as shown here--and you're done! Now you have one long accordion style base for your mini.
Step 9: To adhere the ribbon that will hold your mini closed--you must glue it with strong adhesive to the inside back cover of the album. I used hot glue to keep mine secured. My ribbon measured approximately 20" in length. You must adhere your ribbon to the back cover prior to adhering the album pages. The album pages will be adhered over the ribbon--which is why the ribbon has to go first.
Step 10: Voila! The completed album...all I did here was adhere the accordion pages to the covers & I was done. The tags that go into the pockets measured 2" x 3 3/4" and my photos all measured 1 3/4" x 3 1/2". Last step is to embellish away!
Here's the album closed & from the backside. As you can see, you don't see the ribbon from behind because it's adhered to the inside of the back cover.
Hope you all enjoyed this tutorial & enjoy the rest of the week. Happy crafting!


No comments:
Post a Comment
All comments are very much appreciated. Thank you for stopping by!