HOMEABOUT MERESUMETUTORIALSMY FAVES

Wednesday, September 21, 2011

My Sweet Little Boy Layout


Good evening fellow scrappers! Today's page is one based on my little Toby. He's my very first dog & he never ceases to amaze me. It's like he's a 2 year old little boy trapped in a furry body. You can always tell what he's feeling or trying to convey with his facial expressions. He understands everything you tell him & he even seems to be bilingual since my husband always speaks to him in English & both my mom & I speak to him in Spanish. Regardless, he understands what we're telling him! To me, he's my sweet little boy & always will be.

This is a DT project for Stamp Enjoy. Once again the entire background is stamped/misted or inked.

Here's a close up of one of the 2 large flowers seen on this page. I have a brief tutorial here on how to make these flowers if interested. They're very simple, but add a nice touch.

This page is also for the "Stick With Helmar September Challenge". My friend Natasha gave me the heads up about this site & I went simply to be nosy! :-) However, when I saw this sketch I absolutely LOVED it & found that these pictures of me & Toby that I've been wanting to scrap for a while were just right for this sketch. I was lucky enough to have a bottle of Helmar's 450 Quick Dry adhesive in my stash (sometimes it pays to just buy everything in sight) & decided to give this sketch challenge a try.

I used safety pins as embellies. I have tons of safety pins that I bought ages ago & never figured out how to incorporate them into my pages. Well, this is a very simple way to add a couple to a page. So I used about 8 pins out of my 800...it's a start! :-)

A close up of one of the stamps by Stamp Enjoy. This one is called Petit Rond 1. All of the splashes & splats seen in the background are made with stamps. I used a combination of Vintage Photo distress ink & Anchor's Away Coloringz by Shimmerz for my stamping.

The largest circle was cut out of corrugated cardboard. I spread some Midnight Blue Stickles all over it with my finger.

A close up of the 'Puppy Love' tag.

This large circle is a stamp by Stamp Enjoy. It's called Bordure Rond 3. TIP: I wanted this stamp to be in a very specific spot. So instead of stressing myself out on the exact placement of the stamp--I stamped it onto a transparency with black Staz On & cut the image out. This way I was able to position the image exactly where I wanted.

A close up of the title. The chippie is from A2Z Scraplets. I kept the texture of the title simple. I painted it with navy blue acrylic paint--once dry I inked it with embossing powder & heat embossed it with Kaleidoscope transparent embossing powder by Stampendous. In person the title has an amazing shimmer.

Thanks to all of you who take the time to drop by...

Photobucket

Sunday, September 18, 2011

Water Color Paper Flowers Tutorial


Good evening once again fellow scrappers! It's a Sunday evening & I'm clinging to it for dear life. I REALLY don't want to go back to work tomorrow...but what can you do? Just keep playing the lotto & hope that Lady Luck will one day pay me a visit...

I thought I'd share a brief tutorial on how I went about making these flowers. They're made out of water color paper. Water color paper is excellent for creating flowers or any kind of embellishment where you wish to use pigment powders such as Perfect Pearls for applying color & shimmer. For this particular flower I used Mandarin Perfect Pearls with a hint of Copper. Besides any kind of pigment powders & water color paper (I found water color paper at my local Michaels; this should be available in any arts & crafts store) you'll also need a water color pen which can also be found at your local Michaels or arts & crafts store. So let's get started!

Wednesday, September 14, 2011

Ur Eyes (Say All) Layout


Good evening fellow scrappers! Today's page is one that I had absolutely no design mapped out in my head for--all I knew was that I wanted to scrap these two pictures of my husband. I just grabbed my stamps & stamped away & this was the end result.

This is a DT project for Stamp Enjoy.

My husband has these deep blue eyes. The complete opposite from my dark brown. At times, especially in the morning--they are crystal blue. I took these pics during one of these mornings. I told him to give me one of his 'sexy' poses. Well...this is a sexy as he gets folks! :-)

As mentioned, I did a lot of stamping & misting on this one. Just about the entire background is stamped. I used stamps from Stampin' Up, Tim Holtz & Stamp Enjoy.

In this close up you can see a combination of 3 stamps. Both round stamps are from Stamp Enjoy. They are Petit Rond 1 & Bordure Rond 3. The script stamp is by Tim Holtz.

Another close up of the same two stamps by Stamp Enjoy. The birds in flight stamp is by Tim Holtz. In the corners I punched multiple times with McGill hand punches of various round sizes. I think inked over the punched holes with yellow ink. Finally I filled the holes with Black Diamond Stickles.

A close up of the large chippie. This chipboard is by Dusty Attic. I painted the chippie with yellow acrylic paint. Once dry I dabbed embossing ink on it & then heat embossed it with Star Dust transparent embossing powder by Stampendous. This technique gives the chippie an amazing shimmer that is appreciated better in real life.

The metal flowers are by Prima.

This vintage car stamp is also by Stamp Enjoy called Voiture Ancienne. The stamp of the city skyline is by Tim Holtz.

Finally a close up of the 'bead stitching' I did. Basically these are just very large stitches & I thread multi-colored beads onto every other stitch.

Thanks to all of you who stop by--the visit is always very much appreciated.


Photobucket

Friday, September 2, 2011

Mini Owl 'Love' Album


Good evening once again fellow scrappers! Today I bring you my first shaped mini album. I'm very happy how it came out! This tiny album measures about 3" inches in height. So when I say it's tiny--I mean it's tiny! :-) I used the Mini Owl Album by Clear Scraps.

I have to admit that I was very much inspired by Irene Tan (Scrapperlicious) when making this album. I took many of her tips & techniques to make this small little treasure. It's funny how something this small can utilize so many different techniques. I'll be highlighting a few of these techniques in this post.

This was also a DT project that I made for Stamp Enjoy.

I made the black & red beaded flower seen on the cover. I have these beaded flowers in a variety of colors available in my small Etsy shop. So if you like them--feel free to stop by.

First technique tip is the black flourish seen on the cover. I used Tim Holtz's Elegant Flourishes die with grunge board. I cut the flourishes in several pieces to use throughout the album.

TIP: To get that 'shimmery' look on chipboard or grunge board I first painted the flourish with black acrylic paint. I then heat embosssed it with Star Dust embossing power by Stampendous. In person this gives of a very shiny look!


The 'Love' stamp is by Stamp Enjoy. All the edges of the album's pages were inked with Tea Dye distress ink. I also randomly applied Silver Stickles along the edges of the pages to further dress them up.

Rub ons were also widely used throughout this mini album as well as flat flowers in order to avoid making the album too bulky.


The album is primarily about family & the love that is shared amongst family. I went online & found several quotes that went along nicely with the theme of my album. I then printed them onto cream colored cardstock, distressed the edges & inked them.

TIP: In this photo you'll notice that the page is see-through. This entire album is clear acrylic. I covered most of the pages with paper but I left a couple of them without paper. Instead I covered these pages with alcohol inks & ran them through my Big Shot in order to dry emboss them. This techniques gives off a completely different look.


Ribbon was randomly applied throughout the pages of the mini album. I punched holes through the acrylic with my Crop-a-Dile & then tied pieces of ribbon through these holes.

The floral stamp seen here is by Stamp Enjoy titled Balisier. TIP: If you don't have enough room for a specific stamp or if you want to place the stamp in a difficult spot try stamping the image on a transparency or acrylic & cut it out. This way you can place the image any where you wish. Just make sure you use glue that dries clear when adhering the transparency. Also to further dress up your images--add a bit of clear Stickles such as Crystal or Star Dust as shown in this screen shot.

Thanks to all of you who stop by. I truly appreciate your visit. I hope to have the time to make more mini albums. These make such wonderful keepsakes that can be passed down to many future generations.
Photobucket

Wednesday, August 24, 2011

Priceless Layout


Today's page is one based on my wedding. This is one of my favorite pictures from that special day. The angle the picture was taken was just right in my opinion--it's just one of those photos that always makes me smile.


This is a layout I've done for Stamp Enjoy. I primarily used papers from Kaisercraft's Chapter One collection. I did some stitching, stamping, misting, lacing & distressing on this page. I used Martha Stewart's Wildflowers punch for the border in the upper part of my page.


A closeup of the chipboard border I used for the lacing. This chippie is by Dusty Attic. I first painted the chippie with black acrylic paint. Once dry I inked it with embossing powder & heat embossed it with Kaleidoscope Transparent embossing powder by Stampendous. I found this particular embossing powder at my local Michaels. I absolutely love the effect this particular embossing powder gives as shown in this photo! In person, it adds a wonderful touch to the page.


A closeup of the double lacing. I have a brief tutorial on this lacing found in my blog. If interested, you can find the tutorial for this double lacing here.


A closeup of the stamping. This stamp is by Stamp Enjoy & is called Balisier. I stamped it by using three different shades of inks. The black was primarily to give the flower a 'shadow' effect.


A closeup of the flowers & stick pin. I made the stick pin myself. It was my very first stick pin & I'm really happy how it came out!


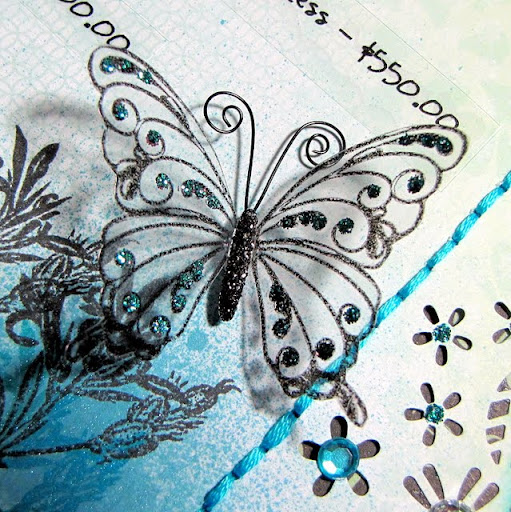
This is a closeup of the clear butterfly. I currently have this butterfly available in my Etsy shop. If interested, please feel free to visit my small shop. You can also see a bit of my hand stitching in this closeup.


Finally, a closeup of the other Dusty Attic corner chippie I used & of the acrylic flower. The Dusty Attic chippie was first painted with white acrylic paint & then heat embossed with Star Dust embossing powder by Stampendous--also found in my local Michaels.

The acrylic flower I found in an Etsy shop called FrogFeathers.

You can also see that I further decorated the floral design of the punch by adding rhinestones & Stickles in the center of the flowers.

Thanks to all of you who stop by--I very much appreciate the visit!


Photobucket

Double Lacing Tutorial


Hello once again fellow scrappers! Today I'll be showing how I went about doing the double lacing seen in my 'Priceless' page. I call it 'double lacing' because it uses two ribbon strands instead of just one.


Besides ribbon, you can also use twine or even tulle to give it a softer look. I got the lacing bug from my scrap buddy Natasha who religiously uses it on her pages. I've taken her love of lacing & have added my own small twists to it--this is one of them.
Both strands can be the same color or different. I find that having strands in different colors looks better--but the choice is yours. You can also mix & match what you use for the lacing such as one strand of ribbon & one strand of twine.
Let's get started...

Wednesday, July 13, 2011

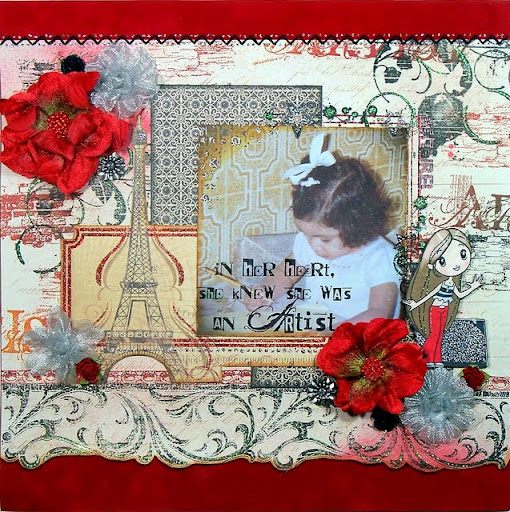
Artist Layout


Good evening once again fellow scrappers & bloggers! Today's post is one based on yours truly. That's me at a very young age doing what I've always loved to do...draw! Gotta love the big ol' bow in my hair & the so very 70's wall paper! :-)

As usual, I did an overload of stamping on this page. The entire background is stamped including the large flourish scroll border you see at the bottom. This is a DT page for Stamp Enjoy. I've also used stamps by Tattered Angels & Stampers Anonymous. Some stitching, misting & Stickles to accentuate my stamped images added the final touches to the background.

The 'artist' sentiment that I stamped directly onto my photo is by Stampers Anonymous. Ensure that any stamping done directly on photos is with permanent inks such as StazOn or else your stamped image will smear.

The red velvet flowers were by Petaloo & the silver ones by Prima. Here you can see a close up of the stamped flourish border & how I dressed up the flourishes with a bit of Diamond Stickles. The flourish stamp is from a set called Architectural Trims by Tattered Angels.

This next screen shot shows a bit of the zig-zag stitching I did & a texture stamp by Stamp Enjoy titled Volutes et Ronds. I have to say that I'm in love with this stamp. I've used it in just about all my backgrounds because it adds just the right amount of grungy texture.

Tip: Dress up your stitching with a bit of Stickles. I added two drops of Silver Stickles in between each zig-zag stitch to give the stitching a different look.

Here's a close up of some heavy hole punch distressing that I did to the corner of my photo. Just take hole punches of different sizes & randomly punch away at a corner--then ink it up with some distress inks. I used Tea Dye distress ink on my photo. This technique I got from Irene Tan better known as Scrapperlicious.

This very cute little 'artist' stamp is by Stamp Enjoy titled Abreen Artiste. I colored her with Prismacolor markers & dressed her up with Stickles. I used a bit of light pink chalk to add the pink glow on her cheeks.

This final screen shot shows again the Volutes et Ronds stamp as well as the corner angle stamp by Stamp Enjoy titled Naturel. Once again, you can see in this screen shot how I used the Stickles to dress up my stamped images.

Thanks to all of you who take the time to stop by. I hope this page inspires some of you to create your own backgrounds with stamps!

Photobucket


Thursday, June 23, 2011

Precious Memories Layout


Good evening once again fellow scrappers & bloggers. Today's page is one I made for Stamp Enjoy as well as for a good friend & co-worker of mine. My friend has two little girls & I've already had the pleasure of scrapping one of them. Check out this little cutie here. I couldn't forget his other little girl in addition to the fact that her dad told me that she got a little pouty because there was no page for her. So here it is! Am hoping she likes it as much as her sister liked her page. :-)

As usual, I couldn't leave my stamps aside for this one even though the paper I used for my background came fairly decorated already. I further added to the background by adding some stamping, misting & Stickles.


A closeup of the misting & stamping. This clear butterfly is a stamp by Stamp Enjoy titled Butterfly in the Grass. I stamped it with StazOn black ink onto a piece of acrylic, cut it out & then colored in the wings with purple & Diamond Stickles. Tip: if you're planning on doing this technique, remember to add the glitter on the opposite side of where you stamped. When the glitter dries flip the image back around, adhere & you're done! I also added black Stickles to the body of the butterfly.

The heart seen here is also a stamp by Stamp Enjoy titled Heart Foliage.

The red cardstock seen behind the photo was dry embossed. I then sanded down the embossed image.

This rose stamp is a newly released stamp by Stamp Enjoy titled Roses. Just like the butterfly stamp--I stamped the rose onto acrylic paper with StazOn black ink, cut it out & decorated it with some Diamond Stickles.

The white border you see going around the picture is actually white acrylic paint that I tapped on with a stipple brush.

A closeup of the other rose stamp found towards the bottom of the page & more misting. By the way, I used Scarlet glimmer mist on this page.

Finally, a closeup of my second butterfly & the fence. The fence is made out of wood. I painted it with crimson red acrylic paint. Once it dried I spread Black Diamond Stickles all over it with my finger in order to give it a 'stone' type texture.

Other stamps used on this page are by Stampers Anonymous & Tattered Angels.

Thanks to all of you who take the time to stop by my blog...I appreciate it!

Photobucket