HOMEABOUT MERESUMETUTORIALSMY FAVES

Wednesday, December 19, 2012

Christmas 2012 Layout

Hello once again fellow bloggers & scrappers!  Tick tock, tick tock...Christmas is just around the corner!  I still can't believe how fast this year flew by.  Would you believe that I have YET to do some Christmas shopping?  I'm so very much trying to avoid going either the day before Christmas Eve or right on Christmas Eve--but at the rate I'm going--it's looking like I'm heading in that direction--tsk, tsk, tsk...

This week Clear Scraps teamed up with Authentique for a project inspiration blog hop.  Both DT's have created some amazing projects with products from both of these innovative companies.  Today, it's my turn to present my project.

I was given the "Peaceful" collection by Authentique to work with.  This turned out to be perfect timing since we have recently taken our yearly Christmas photo.  I don't usually find the time to scrap my Christmas photos till July!  So am happy to have gotten an early start this time.
Some good ol' fashioned paper tearing & rolling was used on this page.  Here you can see the tearing I did in the upper left hand corner.  I manually tore the papers at an angle.  I then inked the edges with brown chalk ink & with my fingers ripped, wrinkled & curled my paper.

The cute little bird I cut out from the "Solitude" paper that is part of the Peaceful collection.
I'm in love with these cute little mini gift boxes.  I found them at my local craft store Michaels in the mini ornament area.  They're perfect for mini trees & even better for scrapbook pages!
This large acrylic snowflake is of course by Clear Scraps.  It's actually a page from their Snowflake Mini Album.  The pages from these little albums can also be used as embellishments as you can see here.

To see how I gave the snowflake it's texture, feel free to see the tutorial here.

Here's my other snowflake.  I have this one peeking out from underneath my cluster of embellishments.
I randomly applied dots of Xmas Red, Lime Green & Star Dust Stickles to my background.
A big thanks to all of you who stop by for a visit.  Make sure to check out the other DT projects on both the Clear Scraps & Authentique blogs.  They'll be going up all week long!

Enjoy the rest of the week!
Photobucket

Diamond Dust & Acrylic Tutorial

This tutorial explains how Diamond Dust can be used to give your acrylic embellishments some fabulous texture.  In addition to the Diamond Dust you can add a bit more visual interest to your embellishments with either acrylic paints or alcohol inks.

So let's get started first with the acrylic snowflake found on my "Christmas 2012" page.

Saturday, December 15, 2012

Family Layout

Good evening fellow scrappers!  It's time for another Once Upon A Sketch (OUAS) reveal!  This month's theme was "It's December".  December is a month full of different celebrations based on culture & religion.  In my family, December is all about celebrating Christmas & in spending quality time with family.  For me though, it's all about the family.

I've also decided to submit this page to the December White Christmas challenge going on this month over at Berry71Bleu.

This particular Christmas will be extra special since our family has grown with the addition of my newborn son.  :-)  So I decided to scrap our very first 'family' Christmas photos.

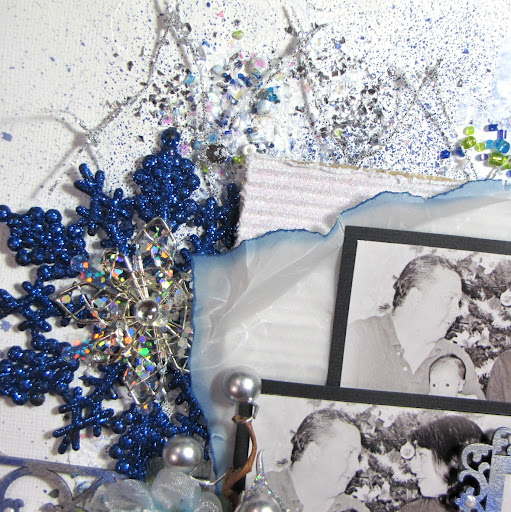
I went with a white, blue & silver theme for my page.  I wanted to try a different holiday color palette other than your basic red & green.  I really liked the end result!

Here's the sketch provided to us by Nadia that my page is based on.
The title is an Expressions Clear Word Title--Family by Clear Scraps.

To give the title it's texture, I first highlighted the edges of the letters with a black Sharpie.  I then spread adhesive onto the letters & applied Diamond Dust.  Once dry I applied Stonewash & Silver alcohol inks directly onto the Diamond Dust.

In person, this technique gives off an amazing shimmer.  To see a more detailed tutorial on this technique, please go here.
The chipboard frame & border is by Imaginarium Designs.  The frame is called Four Circles Border With Lines. & the frame is called Swirly Frame 3" x 2".

For the chipboard--I painted them both with metallic periwinkle acrylic paint & then randomly applied acrylic Silver paint.  I further dressed up both chippies with dots of Opal White liquid pearls & on the border I applied a couple of clear rhinestones.
The silver leaves are by Prima.  The flowers consist of items from Prima & Manor House Creations in addition to mulberry, organza ribbon & jewel cabochon flowers from my stash.

As what has become a kind of tradition with me, my journaling is stored in the scroll.  Lately I've been thoroughly documenting the photos that I've been scrapping--my journaling is more like story telling lately!  A scroll allows me to tell a lot without taking too much space--so I've been using this technique on just about all my pages lately.  If interested in a tutorial on how I make these scrolls--you can find it here.
I got a bit messy with the background!  I first spritzed it with Anchor's Away Coloringz by Shimmerz.  I then applied gesso--I spread it heavily in certain areas.  In the areas where I heavily applied it I added beads, silver chunky leaf glitter by Martha Stewart & shaved ice by Stampendous.

Once everything dried...I applied a bit more Anchor's Away Coloringz & I was finally done!  Loved the texture all of this gave me!
Behind my photos is vellum that I manually ripped, inked the edges & then wrinkled up.  Wrinkling vellum & then unfolding it almost gives off this 'icy' effect which worked great for the theme of my page.
The large silver poinsettia is by Prima.  There's actually a bit of white tulle tucked underneath the poinsettia--but it's barely noticeable in the photo.  You can however, see the thin silver ribbon that I curled & also tucked behind my poinsettia.

Thanks to all of you who stop by for a visit.  Make sure to visit the OUAS blog & check out the other talented DT's take on this month's challenge--do play along if you can!

Enjoy the rest of your weekend!
Photobucket

Monday, December 10, 2012

Christmas 2011 (MCS GDT)

Good evening once again fellow scrappers!  Am back to share my final layout made with the My Creative Scrapbook (MCS) December Main Kit.  I greatly enjoyed guest designing for them this month & enjoyed this kit even more!

For this page, I scrapped a couple of candid Christmas photos from last year that were taken during our annual Christmas card photo shoot.  When you try to take photos with a pet--believe me--you end up with several 'candid' shots!
This is the MCS Main Kit that I worked with.  Everything you see on my page except for the dark brown jute came with the kit.

MCS offers it's customers 4 different kits each month!  Talk about versatility.  They have the Main Kit, Limited Edition Kit, Creative Kit & Album Kit.  So there's something for everyone.

I once again broke out my Xmas Red, Lime Green & Star Dust Stickles and added visual interest to my page by accentuating most of my sticker embellishments & background with dots of Stickles.
The 'Christmas' is a sticker that I first adhered to a transparency & then cut out.  This way I was able to place it on top of my large cream Prima flower.  TIP:  Try adhering sticker embellishments to transparencies/acrylic & then cut them out.  This way you have the flexibility of placing them anywhere on your page.
The buttons were chipboard stickers that came with the kit.  All I did was tie a bit of red & white twine through the button holes & then adhered them to my page.

Thanks for stopping by!  Do take the time to visit the MCS blog & check out the other talented DT's take on this month's kits.

Enjoy the rest of the week!
Photobucket

Saturday, December 8, 2012

Christmas 2009 (MCS GDT)

Good evening once again!  Am back to present my second guest design layout made with the My Creative Scrapbook (MCS) December Main Kit featuring papers by Authentique, Echo Park & Carta Bella.

For this page I went with a simple background & followed a sketch made by Kim Keane.

As mentioned in my previous post--this kit gave me the opportunity to scrap Christmas past--so here's a photo taken in Christmas of 2009.
This is the sketch used as the base for my page.  I followed this sketch pretty closely.
Here's the MCS December Main Kit. MCS offers it's customers 4 different kits each month!  So talk about variety!  They have the Main Kit, Limited Edition Kit, Creative Kit & Album Kit.  Make sure to check out their site to see all the other talented designers take on this month's kits.
This pretty red flower is by Prima & came with the kit.
I added more interest to my page by adding many dots of Stickles in Xmas Red, Lime Green & Star Dust.

The dots & stars seen inside my three circles were hand drawn by me.  Just take a fine tip marker in the color of your choice & randomly draw little stars & dots.  The red snowflakes is a small stamp from my stash.  I believe I found it in the dollar bin of my local craft store Michaels!
I used a mask along with Walnut Stain distress ink to create this flourish.

This mask & the Stickles are the only things that did not come with the kit.  Everything else seen here was part of the kit.

I have one more project to share--I'll be back soon.  In the meantime--thanks for stopping by & enjoy the rest of the weekend!
Photobucket

Thursday, December 6, 2012

Christmas 2008 (MCS GDT)

Good evening fellow scrappers!  Today I bring you the first of three pages I've made with the December My Creative Scrapbook (MCS) Main Kit.  Yes, I was honored to be asked by Pam, the owner of MCS, to guest design for the month of December.  I happily agreed.

My Creative Scrapbook offers it's customers 4 different kits each month!  Talk about variety--there's something for everybody in this kit club.  You have your Main Kit, Limited Edition Kit, Creative Kit & the Album Kit.  Make sure to check out their site to see all the other talented designers take on this month's kits.

This kit gave me the opportunity to scrap pages of holidays long gone.  I started off with 2008 which was also the first year we had our pup Toby.  He's been religiously posing with us in every Christmas photo thereafter.

For the design of this first page, I went with a similar approach to my 'You Should Know' page.  I really like that design & the festive scallop circle that came with the kit lent itself to do a similar design.

Here's the MCS December main kit filled with papers by Authentic, Echo Park & Carta Bella &  lots of other embellishments, ribbons & flowers by Petaloo & Prima.
Everything used on this page came with the kit including this sheer green ribbon that I made into a bow.  I adhered a red brad to the center of the bow.
The kit came with many sticker sheets with tons of tags, borders, images & sayings.  Just about every single sticker I used on this page I first adhered to a transparency & then cut out.  TIP: If you want to have the flexibility of placing your stickers anywhere on your page--consider adhering them to transparencies/acrylic first & cutting them out.  This way you can position & re-postion them anywhere you want & only adhere them once you're ready.
With all the little Christmas themed embellies...this kit lent itself to do lots & lots of layering.  So that's what I did!
This is a close up of the folded corner.

I highlighted the border of the scallop circle with dots of Bisque Liquid Pearls.  I also used this same technique to add a bit more visual interest to the frame around my photo.
Another close up of some more layering.  I dressed up many of my embellishments & the page itself with dots of Stickles in Xmas Red, Lime Green & Star Dust.

Thanks to all of you who stop by for a visit.  I'll be back again soon to present the 2nd page I made with this fabulous kit!
Photobucket

Tuesday, December 4, 2012

Send It Clear Christmas Card

Good morning fellow scrappers! Today I bring you an acrylic card by Clear Scraps.  I finally found the opportunity to play with one of their Send It Clear cards & I have to say that I really enjoyed the versatility these transparent cards provide.

As the base of my card, I used the Deco Send It Clear Card. To add visual interest to the cover of my card I added a variety of elements such as Stickles, tinsel ribbon, acrylic beads, flowers, a doily, paper etc.
The paper doily you see peeking out from behind the large green fabric flower is actually adhered to the inside of the card.  This is where you would write your sentiment.  However, since this is an acrylic card--it peeks through and gives the impression of being tucked behind the large flower.  That's the beauty of acrylic!
This lovely large green fabric flower I bought from an Etsy shop called Funtoolas.  This little shop carries several lovely fabric & silk flowers in addition to coordinated scrapbook kits & other smaller embellishments.
The poinsettia, beaded flower and small white fabric floral spray are from my stash.  The mulberry paper white flat flower is by Manor House Creations.

You can see in this screen shot that I highlighted the edges of the cover with dots of Stickles.  On the right side I used Xmas Red Stickles & on the left side I used Silver Stickles.
I tucked a brad underneath the green & white flowers.  The clear flower gem cabochon I bought from yet another Etsy shop called Oh What Fun.  I found this little shop to be fun indeed with tons of cabochons to pick & choose from!
TIP: I highlighted the border in the inside of my card with a bit of Diamond Dust.  This gives the border a bit of a snow/tinseled look.  I followed the same steps as seen in my Snowy Tinseled Frame Tutorial.  Except here--there was only one simple step.  Just adhere your double sided tape along the edges--peel off the liner & then apply your Diamond Dust & you're done!
Here's the card with only the left side open--can't get enough of those transparent effects!
Here's the card with the right side open only.
Finally, here's the card fully opened.

I hope this inspired some of you to play with acrylic cards--they really do make for very unique & innovative cards.

Have a great rest of the week!
Photobucket