HOMEABOUT MERESUMETUTORIALSMY FAVES

Tuesday, February 22, 2011

U R on my Mind Layout


Good evening fellow scrap-peeps! Today’s page is titled ‘U R on my Mind’ & is a remake of one of my first pages. This layout serves two purposes—to show how much my scrapbooking style has changed & as a submission for the Bo Bunny sketch challenge.

This is my husband & my little Toby taking a nap together. I just happened to be around at the perfect time to capture a perfect moment. They really are sleeping here too…no acting!

First some details on the challenge. Here’s the sketch we were given. This sketch provided much room for creativity.

I used BoBunny’s Cambridge collection for this page. The papers in the Cambridge collection were just right for a masculine themed page. I concentrated on two main concepts here—the harlequin design & random dots. My stitching, punch work & choice of paper all have either random dots or harlequin designs on them.

The metal flowers you see scattered about my page are actually bead caps. I had a few of these laying around & realized that they make perfect flowers.

The random dots were done with the EK Success Swiss punch. I just punched randomly not caring if I overlapped the dots. Then with a red permanent marker I traced around the circles in order to highlight them. I did this technique on the corner of my main photo & on the top & bottom borders of my page. I’ve seen Irene Tan (Scrapperlicious) do a similar technique—however I did not do such heavy random dot distressing as I’ve seen her do.

With a paper cutter I cut an area in my page in order to insert a tag that contains my journaling. The tag was first inked with distress inks & the journaling was printed on a transparency & then adhered to the tag. Finally I embossed the entire tag with a Cuttlebug embossing folder. Two acid free safety pins & a charm add the final touch to my journaling tag!

Journaling reads as follows: I took this picture while the two of you slept together. You looked so peaceful...at that moment I realized how grateful I am to have you. It's needless to say that no matter where I am or what I'm doing, my thoughts rarely stray from my two sweethearts.

I used Martha Stewart’s Garden Trellis punch to make the frame going around the top of my main picture. The edges of my picture are distressed & inked in Fired Brick distress ink.

I ended up using the woven stitch technique again on this page. For a tutorial on this woven stitch, please go here.

Finally, here’s a close up of my man flower. I call it a man flower because I wanted it to be a rugged, grungy sort of flower. Pink frilly flowers will not do for a page where my husband is involved! I’m afraid he’d file a complaint. I used a combination of Tim Holtz’s Tattered Florals die, Retro flower punch & a 2-tone brown mulberry flower for my man rose.

I hope to make a tutorial on this flower soon. So keep an eye out for it!


I’ve come a long way with my scrapbooking style. Mostly I’ve simply stopped being afraid to try new things. I’m starting to realize that the more adventurous I become…the more creative I can get!

That wraps up today’s post. Thanks for stopping by & I appreciate all your wonderful comments!

Photobucket

Wednesday, February 16, 2011

Heart Breaker Layout

Good evening! Am sitting here watching American Idol & at the same time uploading my latest page titled 'Heart Breaker'--and I mean this in the literal sense.

Here's my little Toby tearing apart my heart! My red doily heart that is. Yep, this is one of Toby's favorite past times--ripping up any paper from my scrapbook stash that he can get his little paws on. When I saw him ripping into my heart doily I decided to take pictures as he did it. Besides--it was too late to save the heart! With Valentines just having passed, I figured this would be a perfect page for the occasion.

There are a variety of techniques on this page. There's masking, stamping, embossing, painting, stitching & a version of lacing.

I used a combination of papers from two Swirlydoos kits. Most of the script you see on the paper is actually a stamp. The vines & swirls you see in the red background was made with a mask & three layers of painting/inking. First layer was white acrylic paint, second layer was a dab of Fired Brick distress ink & final layer was Black Soot distress ink.

In this screen shot you can also see the black stitching going around the page.

The paper behind the photos is actually white vellum that I wrinkled & tore, inked in Fired Brick distress ink & stamped with a script stamp.

I did a version of stitching/lacing once again to make the harlequin background you see in this screen shot.


A closeup of the heart chippie. The heart was painted with three colors of acrylic paint--black, ivory & red. I tapped my paintbrush on the chippie to give it that 'splattered' effect. Then I used a crackle medium to give it that broken glass look.

Finally a closeup of the black swirls. The swirls are made out of grungeboard. I painted the swirls in black acrylic paint. Once dry, I dipped the grungeboard in embossing ink, poured clear Star Dust embossing powder on it & then heat embossed it. In person, the texture of these flourishes are really pretty!


Finally I randomly added Star Dust stickles around the page--it's hard to see in these photos...but they're there!

Well off to finish watching American Idol...believe it or not--it's my husband who loves this show...I just go along for the ride.

Photobucket

Wednesday, February 9, 2011

Woven Stitch Tutorial

This tutorial was used in my Essential Cog layout. This stitch can be used straight or in a circular form.  I think this is what makes this fairly large stitch unique--it can be used in a variety of ways. In a circle, straight at a slant--the choice is yours.

Wednesday, February 2, 2011

Opposites Really Do Attract Layout


Hello again from a very icy North East. Mother Nature seems to be angry for some reason--it's been a rough winter in my book...can you say Spring?

My latest layout all began with the discovery of one picture--a picture of my husband when he was 12 sporting one very goofy smile! He still has that goofy smile--it's one of the many little things that I loved about him...

When I found this picture of him while helping him organize his boxes & boxes of junk (e-hem--I mean 'valuables' as he puts it) I knew I had to scrap it. But I didn't want to just scrap that one photo...I wanted a then & now of both him & myself & I also wanted to convey how different we are but yet, we were still drawn together.

I'm a full blown city girl. My husband is a hardcore country boy. He grew up surrounded with trees, quietness & all sorts of animals like bears, bull frogs, deer & rabbits. I grew up in the city where I could count the trees in my town on one hand, it was always loud & the only animals I remember seeing growing up were the dogs that people took out for their daily walks! Our up bringing affects us up till now. I'm very loud & you can hear my big mouth miles away. My husband is very quiet & tends to blend into the wall paper! But I think that's why we connected. He tones me down & I add tend to turn his usual quiet life upside down!

I did some distressing & stitching on this page--but what I did the most of was stamping. The entire background you see here was made with stamps & some masking.

I used a couple of metal flowers by Tim Holtz to decorate the corners. You can see some bling peeking out from the tear in my paper.

The flourishes you see all along the border of the layout is a flourish stamp by Tim Holtz.

Here you see a closeup of the masking, stitching, more stamping & the texture of the heart chipboard. I used the leaf glitter with UTEE technique to give the heart this texture. It looks amazing in person! If interested in this technique, feel free to find the tutorial here.

On my husband's side I wanted items that identified with him. So I have a picket fence, a rabbit (to represent nature) & a branch. The branch is actually a Prima felt vine that I covered in Copper Stickles & then with Broken China Distress Stickles. Here you can also see the stamping on the fence & the grass I stamped right below the fence.
On my side I stamped a brick wall background & used a stamp of the city of course what else! The stamp is by Tim Holtz & was perfect for this page.

I finished up the page by adding Star Dust stickles on all the flourishes & on the majority of my stamping. It's something I tend to do on all my pages but you can hardly tell from these pictures.

Hope you all enjoyed this page & that it serves as some proof that opposites really do attract!
Photobucket

Tuesday, January 18, 2011

Year 3 Layout


Greetings from a very cold, icy & snowy East Coast! It's because of this weather that I decided to do a tropical themed page. In addition to the fact that I haven't yet scrapped about my three year wedding anniversary trip which happened in early October 2010. I have the tradition of at least doing one page of where we go or do for our wedding anniversary. Well here's the one for year three.

I primarily used the papers that came with the Swirlydoos January kit. The bright colors of this kit was just right for this tropical, warm page.

The flourish chipboard is covered in leaft glitter. For a tutorial on how to embellish your chippies with leaf glitter & UTEE, feel free to go here.
The majority of the edges are distressed & inked. I completely ripped apart a prima songbird vine that came with this kit. You'll find pieces of it all over my page. Here's one of the birds from the vine.

Oh & here's the second bird tucked in the corner along with more flowers. I used my Sew Easy tool by We R Memory Keepers to pierce scalloped shaped stitching holes. This tool allowed me to stitch scallops without too much of a hassle! I then inserted eyelets along the scallops.

The tropical vine pictured here is an item found in my Etsy shop. If you like it--feel free to check it out.

A big shout out & thank you to Natasha for giving me the bamboo sticks that allowed me to make the bamboo frame. Scrap buddies are the best! :-)

Ooops, there goes more of that prima vine. I wrapped some flowers & parts of the vine all around the bamboo frame.

I printed the journaling on vellum. The journaling tells the story of how we didn't even know where to go for our anniversary. Let's just say that these are just some of the places that were thrown: Aruba, Costa Rica, Puerto Rico, cruise to who knows where, Virgin Islands, Fiji Islands (this was when I was getting impatient) & Brazil...

A closeup of the leaf glittered 3. For a tutorial on this, please find it here. You can also see part of my stitched frame here & my flower masking.

Finally, one of the latest additions to my growing butterflies in my Etsy shop...Madagascar Sunset. This little beauty was based on an existing butterfly from Madagascar. However it actually isn't a butterfly--it's a moth. But for the simplicity of my shop--it fell under the butterfly category. Just some butterfly/moth tid bit for your knowledge. Either way, this little guy was just right for my page.

Hope you enjoyed my 'tropical' page--especially if you're in cold weather just like me! May it bring you many warm thoughts!
Photobucket

Leaf Glitter & UTEE Chipboard Tutorial


Hello once again! This tutorial shows how to embellish chipboard with leaf glitter & Ultra Thick Embossing Enamel (UTEE). I used this technique on my 'Year 3' layout. The leaf glitter gives chipboard an amazing sheen but if you top that off with UTEE--wow! It's an amazing effect in person. I tried my hardest to capture it with my camera--but it was so shiny & reflective that it took many tries & a lot of tweaking with my camera settings--but I think I got it!

Let's get started...

Tuesday, December 14, 2010

The Christmas Money Shot Layout


Happy Holidays fellow scrappers & bloggers! Tis the season right? Tis the season for stressing, Christmas pictures, Christmas cards, Christmas music, gift shopping & oh yes--stressing!

This layout is about one of my Christmas traditions which is the annual picture my husband, myself & Toby take in front of the Christmas tree for the holiday cards. As always it took about 24 tries in order to get that perfect shot. Basically the perfect shot is when all three of us are actually looking at the camera. Getting Toby to stare at the camera at the right moment is a task in itself. The three pictures in a row are just a few of the many 'no good' shots taken. The full colored picture is the Christmas Money Shot & it's the actual photo I used for this year's Christmas cards. The journaling tag is behind the title & the poinsettia embellishments. Journaling reads as follows: Every Christmas it's the same routine--two dozen or more pictures taken by the tree. An endless quest, a serach for the Holy Grail, hoping & dreaming that Toby will actually look at the camera at that exact moment the picture is taken. It's like winning the lotto when we finally get the perfect Christmas money shot!
I did a sort of 'staggered' lacing & once again have used eyelets on my page! Thank you Natasha for having me discover the wonderful world of eyelets *wink*. I distressed half of my page & then tucked a thin layer of multi-colored tinsel under the distressed border. This tinsel was from my own stash.

I mainly used the Swirlydoos December kit for this page. Only a few handmade embellishments are from my own stash.
An example of this are the transparent holiday ornaments seen on this page. For a tutorial on how these ornaments were made please go here.
Behind the ornaments I did some masking. I used a flourish mask from Layers of Color & used Forest Moss distress ink. The soft script print you see here was actually a stamp. I used gray ink instead of black because I wanted a subtle script displaying behind the masking & the ornaments.
The tinseled snowy frame seen in this closeup is also something new I tried in order to give my picture a unique holiday frame. If interested on a tutorial on this tinseled snowy frame please go here.


The Christmas butterflies are embellishments from my Etsy shop. If you like them, I made a few extra sets & are currently found in my shop. Feel free to drop by if interested!


Finally here's a closeup of the faux metal & acrylic poinsettia embellishment. I made a brief tutorial for this as well. If interested, please go here. I tucked both the journaling & my title behind this embellishment.
Thank you for stopping by & for visiting! I'm just so very happy that I was able to make a Christmas page in December & not in July which is how it usually works for me!
Stay warm...till my next post...
Photobucket

Faux Metal & Acrylic Poinsettia Tutorial


In this tutorial I'll be showing how I went about making the faux metal & acrylic poinsettia embellishment seen in 'The Christmas Money Shot' layout. I learned this technique from my local scrapbook store on a class I attended.

I completely improvised as I went along for this embellishment which is why I don't have a picture of my list of supplies. I kept adding & changing as I went. This is the list of supplies I finally ended up using: Sizzix die cut, aluminum foil, diamond dust, acrylic or transparency, sturdy scrap paper or grunge board, embossing folder, Big Shot or any other compatible die cut machine, brush, white acrylic paint, scissors, gold stamens or any other suitable item that you'd like to use for the center of the poinsettia, Staz-On black ink, foam pop up dots, glue stick & a partridge in a pear tree! Sorry, had to throw that in there--nix the partridge--whatever that is--I'm guessing it's some kind of bird? Let's get started before I get more sidetracked...

Snowy Tinseled Frame Tutorial


Hello again fellow scrappers! In this tutorial I'll be showing how I went about making the snowy tinseled frame seen in 'The Christmas Money Shot' page.

My goal was to make the effect of an 'icy' snowed in frame. I'm just glad I finally got to use one of those Martha Stewart tinsels that I've had in my stash since about forever!

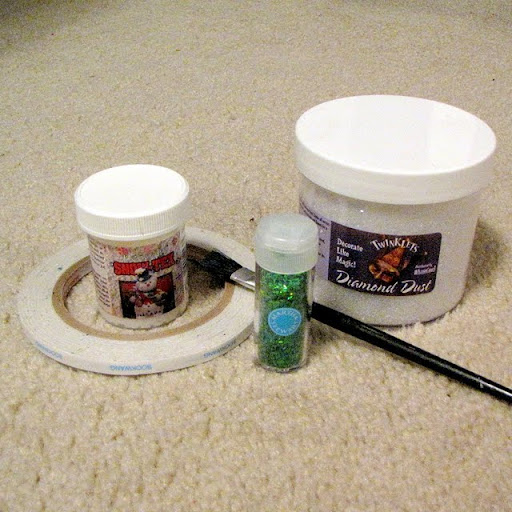
Here are your basic list of supplies: Two sided tape (I use the Sookwang brand tape that came with my Scor-Pal, it is 1/4" of an inch wide), Diamond Dust, tinsel, brush & snow texture (if you don't have snow texture, white acrylic paint will work as well).

Holiday Ornaments Tutorial


This tutorial shows how I went about making the holiday ornaments seen in 'The Christmas Money Shot' layout.