HOMEABOUT MERESUMETUTORIALSMY FAVES

Monday, September 23, 2013

(Because I) Adore You Layout

 Good morning!  I'm back with a page I just created for the Berry71Bleu September challenge.  For this month's challenge you have to use the provided sketch plus any kind of  mixed media.

All the papers used were provided by this month's sponsor Maja Design.  We were given their 'Walking In The Forest' collection which consists of Autumn themed papers in shades of blue, brown, yellow & just a hint of green.

This would be my son giving me his winning smile.  It's amazing how much my little guy actually looks like me when I was a baby.  I had the same dark curly hair, the same huge eyes, the same button nose.  The only two differences is that I have a tan & he's fair skinned plus I have a big mouth to go along with my big eyes.  My son ended up with my husband's tiny little mouth.  However, he's all mom in this one particular photo.
 All chipboard used on this page are by Scrapiniec.  I have to say that out of all the chippies I've used--this is the one that has absorbed mists the best.  I ended up giving all my chippies their texture & shimmer simply by applying a variety of mists in different colors.  I used brown, yellow, orange & tan mists.
 Something that has become customary for me is to store my journaling in the form of a scroll.  So once again--here's the story behind this photo stored on a bit of green vellum & rolled into a scroll.  I have to say--I'm in love with this form of journaling & am consistently using it in all my work.

For a tutorial on how to make these scrolls go here.
 Here's a closeup of the other chippies--I did add dabs of orange paint to these.  I wanted them to stand out just a bit more.

The bubble wrap image is a stamp by Donna Salazar. It was stamped with Versamark embossing ink & then it was heat embossed with a bit of Marmalade Distressed Embossing powder by Tim Holtz.
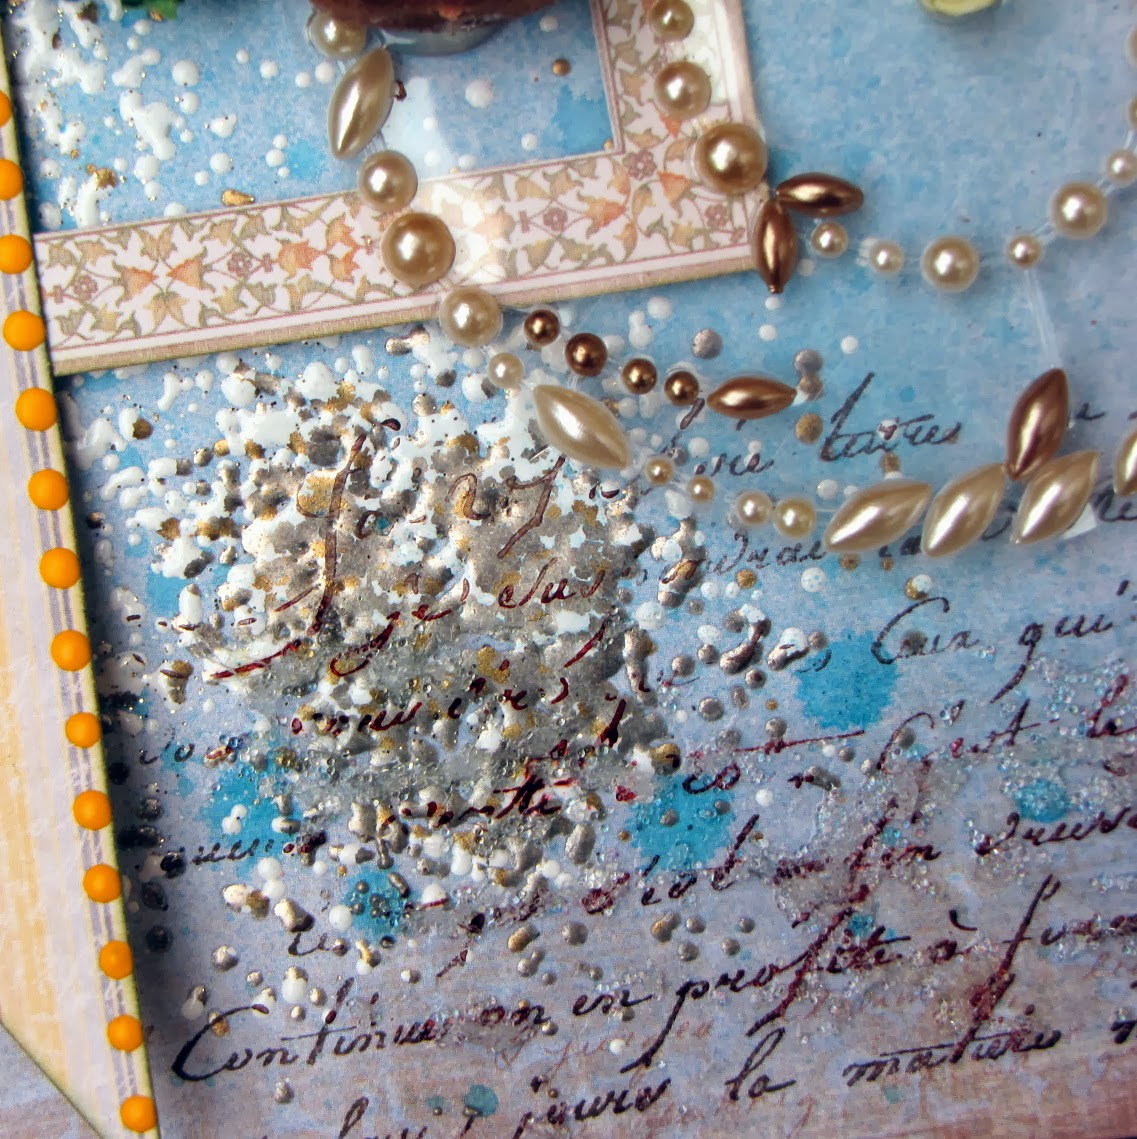
 Several types of mixed media were used to give the background some texture.  Here I combined white, gold & brown chunky embossing powder by Stampendous.  I mixed them up a bit & heat embossed them.  Next I randomly applied some transparent glass beads ontop.  This glass bead mixture can be found in any arts & crafts store.
 With some black StazOn I stamped right on top of my mixed media once dry with a script stamp.  That's the beauty of permanent ink--it sticks onto anything!
My cluster of bright yellow & orange flowers with a touch of bright blue.  I love these little flocked teddy bears that I find at my local AC Moore.  I have a ton of them in all different colors.  They are perfect embellishments for baby/children themed projects.

Thanks for stopping by--don't forget to check out this month's challenge over at Berry71Bleu & play along for the chance to win some prizes from this month's sponsor.

Enjoy the rest of the week!


Photobucket

Wednesday, September 18, 2013

Precious Memories Layout

Good afternoon fellow scrappers!  It's a crisp fall-like day here in the East Coast today--ahhhhh Autumn is almost here which is my most favorite season!  I can't wait until the leaves start turning colors & am more than ready for a pumpkin spice latte by Starbucks!

 Today I have a page I created for Authentique some time ago & have never posted.  For this layout I used Authentique's Irresistible collection which I felt was perfect for a wedding themed layout.

Of course I have been married almost 6 years now and still have photos I haven't scrapped yet from that memorable day...so finding the right photos for this was fairly easy.

I've also incorporated a small 'Memories' acrylic title by Clear Scraps.
I designed my page based on a sketch from Page Drafts.  Here's the sketch I based it on.

The Irresistible collection is all in black & white--I kept it predominantly with these colors & just decided to add splashes of red here and there.

The organza star flower shown here are items from my own stash.  I have an abundance of these flowers in different colors--so many in fact, that I've put some of them up for sale in my Etsy shop.  Feel free to take a look if interested.  
Adding dots of liquid pearls along any border adds a nice subtle visual touch--here I decided to highlight the border of the circular photo with Bisque Liquid Pearls.
The resin birds & bird bath are by Prima...all of the other elements are part of the Irresistible collection.  I'm a big fan of storing small nick knacks in tiny glass vials.  I've had little red heart confetti for the longest time and I finally found some use for them!

The shimmery red hearts are dollar items I found at my local Michaels store.  I'm guilty of buying miscellaneous items such as these when on clearance.  You never know when the perfect opportunity will arise to use them!
How I love acrylic!  You can do so much with it.  For the 'Memories' acrylic title I first highlighted the edges with a black Sharpie marker.  Next I dry embossed the title--embossing is one of the best ways to add a bit of texture to your acrylic elements.  Finally I went along the edges again but this time with Star Dust Stickles to give it a bit of a shine.
Embroidery floss was added for a different kind of embellishment to the background of my page.  I made this by creating some very, very, VERY long stitches!  lol  If interested on how I created these 'strings' I have a tutorial for it here.  The heart banner is a die by La-La Land Crafts.

Thanks to all of you who stop by for a visit...enjoy the rest of the week!

Photobucket

Embroidery Floss Embellishment Tutorial

For a recent page I did for Authentique, I created large embroidery floss stitches behind my photo in order to add a bit of visual interest to my page.  You can see the full layout here.

Let's get started with the tutorial...

Wednesday, September 4, 2013

Welcome To Embrace Serendipity


Welcome to my new blog--Embrace Serendipity!  With a new home, I decided to acquire a new blog with one amazing make over.  A very huge thank you to the talented Emma Stafrace for making this blog such a beautiful work of art!  I'm in love with every single aspect of my new virtual home.

So why Embrace Serendipity you may wonder? Well, serendipity is something that has added many wonderful things to my life. If you look up the definition for serendipity--it's defined as 'finding something good without looking for it'. That pretty much sums up the story of my life!

 I stumbled upon scrapbooking when I needed a creative escape, I discovered my day time job as a Quality Assurance Engineer without even knowing what a Quality Assurance Engineer was! I found my husband when I wasn't even looking for him. I uncovered an amazing love for dancing when I decided to take a Zumba class just because it 'looked like a lot of fun'! Now, I'm even a certified Zumba instructor. The list goes on...so as you can see, serendipity has played a big part in my life & that's how my new blog earned it's name.

I'm still fine-tuning my new blog--but for the most part it's pretty complete.  If you enjoyed my work on Kay's Kreative Korner--then please do remember to continue following me via Embrace Serendipity.

I'll be back soon with a few older projects that I haven't been able to post & stay tuned for many new projects that are in the works for the near future!

Photobucket

Sunday, September 1, 2013

My Firecracker Mini Album Tutorial

Hello once again!  Kay here with a mini album made with the fabulous 'Pride' collection by Authentique.  Even though this collection is designed for Independence Day I wanted to show that it can be used for other themes. What came about by accident was the design of this mini.  When I finished it & showed it to my husband, he was the one who pointed out that when the mini is closed it actually looks like a little firecracker.  The way the tulle puffs out on the top imitates the sparkles of a little firecracker.  So conveniently enough, this mini 'Firecracker' album reflects it's own name.
As many of you most likely know there are many, many tutorials out there for mini albums--so I guess I'll be adding to this collection!  We all have our own take on shared techniques--so this would be mine.  This little album holds a total of 8 tags that I've used to mat 8 photos of my son when he was about 2 months old.  Each tag was made with Core'dinations cardstock from their Whitewash & Tim Holtz Kraft-Core collections.
I strung different colored tulle onto each tag to make it easier to pull the tags in & out.  You can put journaling behind each tag or you can even add another photo on the backside of the tag for a total of 16 photos.  The banners seen on each pocket were cut from leftover 'Pride' scraps by using one of the sticker banners that came with the Pride collection as a template.  I just added a bit of rub ons & dots of clear Stickles to decorate them a bit more.
Let's get started with the tutorial...

Wednesday, August 28, 2013

Bloglovin

Follow my blog with Bloglovin

Photobucket

Wednesday, June 26, 2013

You Are My Sunshine Layout


Hello fellow scrappers!  Yes, I know--where have I been!?  Well just one word.  Packing!  I'm the middle of buying & selling a home & for those of you out there that have done this, I'm sure you're quite aware as to how hectic, stressful & time consuming this entire process is.  We're set to physically move in less than a week & packing/prepping has been taking up a gigantic amount of my time--in addtion to my full time job that eats up 8 hours of my day.  I'm hoping that once I move & get the time to settle down I'll slowly get back into my old routine.  I sure do miss it!  I haven't been able to peacefully scrap in about 2 months now.

Today I finally decided to take a break & put up this post.  For me this is a sanity check--am going back for just a few minutes to something that I love which is crafting.  I decided to post this layout I made for both Authentique & Clear Scraps.  I've also used several of Authentique's new stamps made by Hampton Art.  Authentique has 3 of these sets which are co-branded by Hampton Art.  All papers used were from Authentique's Seasons: Summer Collection.

This is my son during one of his 'tummy time' sessions.  He's got these huge almond shaped eyes & this photo captured those big doe eyes at thier best.  :-)

The script stamp as well as the stamped 'You Are My Sunshine' title are new stamps by Authentique/Hampton Art.  The script stamp is from the 'Keep Me Posted' collection & the title is from the 'Footloose' collection.

The stamped sentiment is from the 'Grateful Heart' collection.

My cluster of embellies including my journaling which is stored in a scroll.  This is officially a must for me now.  I document all the stories behind my layouts & I found this to be the most convenient for me.

For this stamp I heat embossed it with black glittered embossing powder to give it a bit more dimension.

This acrylic frame is by Clear Scraps.  It's the Small Oval Fancy Frame.  To give it color I applied drops of alcohol inks directly from the bottle onto the acrylic frame.  Then waited a few minutes for it to dry.  Directly applying alcohol inks onto acrylic in this way produces much more bolder colors & design.

Another close up of the acrylic frame as well as my masking in the upper corners of my layout.  The mask used is the 6" Swirl Mascil also by Clear Scraps.

I added more dimension all along my page by placing dots of acrylic paint onto my honeycomb die cuts. 

Thanks for stopping by & I hope to be back soon with more posts.  I'll most likely be MIA for a bit longer while I move & actually settle down.  In the meantime, enjoy the rest of the week!

Photobucket

Wednesday, May 15, 2013

Endless Love Layout


Good evening fellow scrappers!  Happy May--to me May is equivalent with mom.  This particular Mother's Day was very specifal for me because it's the first Mother's Day that I'll be celebrating being a mom myself!  What an incredibly rewarding feeling this is!  So in honor of this speciall event here's a page made with me & my little guy.  This is a DT page that I've made for Authentique & Clear Scraps.  I've used Authentique's lovely papers from the 'Grace' collection. 'Grace' is geared towards mothers, sisters, daughters, grandmothers or friend.  It's lovely mixture of florals, feminine patters & sweet sentiments which made it just right for this layout based on myself with my little guy.

As my son gets a bit older it's become quite clear that he's got my eyes.  They are large, a bit on the almond shaped side & a perfect shade of dark brown.  My husband's eyes are blue & I remember that I wished so much for my son's eyes to have my husbands ocean blue eyes.  But fate decided that he would have his mother's eyes--and I'm so happy it turned out this way!  I feel so very connected with him in many ways--but the fact that he has his mother's eyes adds one very extra special connection to me.

I've also used one of Clear Scraps newest additions--a Clearly Framed Medium Circle Scallop Frame on this page.


As you can see, I've become addicted to these tiny flocked teddy bears that I buy at my local AC Moore.  I've bought many of them in all different colors!  They make for the cutest embellishments for child or baby themed pages!

The wooden sentiment spoke to me in a special way--basically because since my son was born I've always sang to him "You Are My Sunshine".  Whether it's to soothe him from crying, to put him to sleep or to make him smile--the song does wonders for him.

I've once again used the hot air balloon die by La-La Land Crafts!   I feel that it's the cutest die & can be decorated in several ways.

To make the waved border seen in the background of my page, I've used a template by Kiwi Lane called Paisley Place.   To further decorate this border I've adhered a bit of lace to the bottom layer & edge of the top layer is distressed & inked.

Here you can see several papers from the 'Grace' collection layered to form my background as well as one of their many stickers that are part of & coordinate with this collection.

Here's a close up of the Clear Scraps Scallop Circle Frame.  I first highlighted the border of the frame with a permanent white Sharpie Oil Based Paint Marker.  I then cut the frame in half--ran each half through my Big Shot in order to dry emboss it & give it a bit of dimension & texture & I was done!  This is a very simple technique for acrylic but adds a really nice subtle touch to any project.

The butterflies are items from my small Etsy shop--these would be the 'Vintage Flair' butterflies.  I have these & many other butterflies available in shop here if interested.

This lovely handmade flower was bought from yet another Etsy shop titled 'More Paper Than Shoes'.  Anna, the owner, makes many beautiful & delicate handmade flowers--not just for crafting but for weddings, corsages and more!  You can check out her shop here if interested.

I really enjoy all the little sentiments that came with this collection.  I didn't have many coordinating embellies on hand for this page--but when I saw all of the little sentiments & stickers that came with 'Grace' I realized that I had nothing to worry about.

Thanks for taking the time to stop by--hope you all had a wonderful Mother's Day.  Enjoy the rest of the week!
Photobucket

Tuesday, May 7, 2013

24/7 Layout


Good morning fellow crafters!  Today's post is a page made for Berry71Bleu's May Challenge.  The Berry71Bleu DT had the honor of collaborating with Once Upon A...Sketch (OUAS) this month!  So to enter this month's challenge you must first use the sketch provided by Nadia from OUAS & incorporate their challenge of using numbers anywhere on your project.  The number can represent anything from your age, to birthdays to an anniversary--anything with numbers will work.  Second you'll need to incorporate chipboard into your project which is Berry71Bleu's challenge.

I decided to use numbers as part of the sentiment behind my page.  This would be my son at approximately 1 1/2 months of age giving me one of his more 'pensive' looks.  :-)  Part of my journaling states how he's in my heart '24/7'.

Here's the sketch provided by Nadia from OUAS that my page is based on.

I added much more texture to my background by combining several stamps & creating a sort of collage.  I used approximately 6 to 7 stamps & created the collage by overlapping the stamped images & by using different inks to do so.  I've used black, green, purple & gray inks just to name a few.

All papers are from Lucky7 Factory & all the chippies are from Scrap FX which are also a few of Berry71Bleu's sponsors for the month of May.

I created simple circular embellishments throughout my page by using a circle punch to punch out circles & adhere them to the center of my circular stamped images with a foam dot.  I inked all the edges of the circles to make them stand out more & added dots of acrylic paint to sections of the circle borders. 

The spiral tissue flowers were also sponsored by Lucky7 Factory.  The transparent butterfly is a new embellishment that will soon be available in my Etsy shop.

I'm a big fan of owls & love placing them in my pages whenever I can.

This lovely tag was handmade by Marivic & my journaling is stored in the scroll right next to the tag.  Storing my journaling in the form of scrolls has almost become my trademark.  I tend to use these on just about all of my pages.  I have a tutorial on how I make these scrolls here if interested.

Finally, my cluster of embellies consisting of a flocked black teddy bear, spiral tissue flower by Lucky7 Factory & ribbon flowers that are from my own stash.

Thanks for stopping by & do take the time to visit both the OUAS & Berry71Bleu blogs for more inspiration.  Play along with both if you can!  There are prizes to be won by a few lucky winners on both challenge blogs!

Photobucket