HOMEABOUT MERESUMETUTORIALSMY FAVES
Showing posts with label OUAS DT. Show all posts

Tuesday, December 3, 2013

October Layout

Good afternoon fellow scrappers...today I'm presenting my final page for Once Upon A Sketch (OUAS). My time on the OUAS DT went by very quickly but was so very rewarding at the same time.  Thank you again Nadia for giving me the opportunity to be part of such a fabulous design team.  Best of luck to the new DT starting in January 2014!  There are some very notable ladies on the term for next year...

So the theme for the month of December is: My Favorite Month.  This was very simple for me.  I've been harping for a long time now that Autumn is my favorite season...and Autumn is in it's prime in the month of October...so October it was.  I had recently taken a photo of my son studying a leaf that had fallen from a tree & it worked just right for the theme of my page.  I went Autumn crazy with this page & used several 'Autumn' related embellishments that I had in my stash.

Paper used is by Maja Design from their 'Walking in the Forest' collection.
Here's the sketch provided by Nadia--as usual a versatile sketch that you can do much with.
This little envelope which was part of the 'Walking in the Forest' collection--was cut out, assembled & used to store my journaling.
This little sunflower vine is by Prima as are the large brown felt flowers.  Yay for those cute little mini pine cones...how I love them!  Of course I had to have an owl tucked in here somewhere...owls are one of my absolute favorite type of birds as well as embellishment.
So for many years I've had this gigantic feather in my stash & every time I ran into it I wondered 'what the heck am I going to use this for?'  I can't tell you how many times I almost tossed it.  Well the perfect project finally arrived & I was able to use it!  So this is why I have a gazillion things in my stash & never throw anything out!  LOL 
These organza ribbon star flowers are items from my stash.  I have several of these in different colors & are available for purchase in my Etsy shop.  Feel free to visit if you like them.
These little haystack mini brooms are other tidbits that I have in my stash & once again--I found the perfect project for them...alongside the mini acorn!  Seems like I got to use many of my oddball embellishments for this page--but it all came together nicely I think!

Make sure you visit the OUAS blog to check out the other DT's take on this month's challenge.  Thanks for stopping by & enjoy the rest of the week...

Photobucket

Tuesday, November 5, 2013

My Happy Place Layout

Good morning fellow scrappers!  It's a chilly crisp Autumn morning here in the North East Coast...my kind of weather!!  Am sitting here at the office drinking my morning cup of coffee.  Shhhhhh, don't tell the boss that I'm writing up this post at work!  Tsk, tsk, tsk...however, if I don't take the time now--this post will never go up!

It's a new month & with a new month comes a new challenge over at OUAS.  The theme for this month is 'My Happy Place'--which can be interpreted in many ways.  I interpreted it as my 'happy place' being right next to my three special guys--my family.

A couple of weeks ago we took a nice Sunday stroll through the park by my house & it was the perfect weather for some photos.  Luckily I was able to capture this one with all three of my boys.  Catching Toby without his tongue out is just about impossible!  :-)  If he's less hyper he gives his 'doggy smile' but this one such day he was so happy to be outdoors & in the park no less that he was panting up a storm.

So my happy place is next to my husband, son & fur-child Toby--wherever they are is where my happiness is...simple as that.

I've used papers from Authentique's Strong collection & a large acrylic frame by Clear Scraps.
Here's the sketch provided by Nadia that I based my page on.  I tend to use sketches more as guidelines and interpret the various elements on them in my own way while still keeping the basic flow of the sketch.
 I recently got my hands on Tim Holtz's Ornate Frame Bigz die and of course used it right away!  lol  That's the black frame you see in the upper right hand corner.

In this closeup you see how I gave the acrylic frame it's color.  I used a mixture of Ginger & Meadow Green alcohol inks and applied them to the acrylic with the applicator tool.
 With a medium sized paint brushed I randomly splattered a bit of green & black mists along the background.  At the very end I go over some of these splats with clear Stickles.
 This chipboard butterfly is by Imaginarium Designs.  I simply inked it with some embossing ink & heat set it with Marcasite embossing powder by Stampendous.
 Here's my traditional & favorite form of journaling...I've once again stored my thoughts on a scroll & tucked it underneath my photo.  I have a tutorial on how I make these scrolls here if interested.
 The large black flourish die is by Cheery Lynn.  This is their Mega Fanciful Flourish die.  I've highlighted some of the scrolls on the flourish with dots of Bisque Liquid Pearls.

The gold & pearl button are leftover trinkets I have from the Zeus and Zoe Etsy shop.


The two small yellow ribbon flowers in the upper right hand side are flowers from my stash.  I have many of these & have a few bunches up for grabs in my Etsy shop.  I have several of these ribbon flowers in different colors.  Feel free to take a look if interested.  They make for great embellishment fillers. 

Make sure you drop by the OUAS blog to see the other talented DT's take on this month's challenge.  Take the time to play along if you can.

Thanks for stopping by & have a great rest of the week!
Photobucket

Tuesday, October 1, 2013

Enjoy The Journey Layout

Good afternoon! Today I'm sharing my DT page for the latest OUAS October challenge.  The journaling theme for this month is: "The Journey..." this can be interpreted in anyway you see fit.  I interpreted it as our everyday journey through life & how for my son, he's at the beginning of his very long journey.

I used the Wander paper by Basic Grey which has a traveling theme with many arrows, cars, maps & stop & go stickers/elements.  I included all kinds of embellishments related to travel which I linked to the theme of taking a long 'journey through life'.

My son is having one big giggle fest in this photo.  He was crawling around on the rug when he just started laughing at a Jim Carrey movie that was playing on the telly during that time.  I'm still trying to figure out how a 9 month old was finding humor in a Jim Carrey flick--my guess is that he found the faces & sounds Jim Carrey was making simply hysterical!
Here's the sketch provided by Nadia & what I based the design for my page on. 
The edges were all heavily distressed & I layered several papers & elements with pop dots for added dimension.
There are several safety pins in my collection of embellishments in all kinds of colors.  I tend to use them to keep my rips & tears in place as shown here in this closeup.  My tearing was more random this time instead of linear.  That very cute banner is a die by La-La Land Crafts.
I'm in love with this hot air balloon die also by La-La Land Crafts.  It's so adorable & fits so many children themed pages.  Come to think of it...it works for just about any theme since I haven't just used it for pages regarding my son. 

I loved that winding road sticker element that is part of the Wander collection--to me it speaks volumes because that's how I interpret this road we call Life.  I see it as being full with many twists & turns--in the end you never know quite where you're going to end up--all that should matter is that wherever you do end up--let's hope you're happy & with no regrets.
The envelope holds my journaling.  My writing was heartfelt & for my son's eyes only--I'm hoping that when he's old enough--he'll read it & take something from it. 

Let's just say that I've gotten a 35 year head start on my own journey & have several lessons learned that I'd like to pass down to him--he'll most likely encounter the same obstacles on his journey that I have on my own--I hope to be there for him to help him get through his obstacles & to learn from them.  The road is long & full of unexpected obstacles as well as smooth traveling where the coast is clear.  We try to take the road less traveled because we want to make our own trails not walk behind existing ones.  It's a fulfilling & exciting journey where we meet so many other travelers from different walks of life. I'm hoping he makes the most out of it like I have tried my best to do so for myself.

Feel free to visit the OUAS blog & see the other DT's interpretation of this month's challenge--as always do take the time to play along if you can! 

Thanks to all of you for stopping by & enjoy the rest of the week.
Photobucket

Monday, April 1, 2013

Complete Love Layout


Good afternoon fellow scrappers!  It's time for another challenge over at OUAS & as usual Nadia has picked a fabulous theme.  April's theme is: The Best Day of Your Life

This can be any day that is of significance importance to you.  Anything from a child's birth, wedding, buying your first home, to getting that much deserved promotion or landing your dream job there really is no right or wrong.

From my perspective, I've picked the recent birth of my first son.  As the title implies, having him come into our lives felt as if our family was finally 'complete'.  It's been my husband, my fur pup Toby & myself for 5 years now.  Having my son was like finding that missing piece to a puzzle.  Our family now feels complete as well as our circle of love.

The very large 'Love' is one of Clear Scraps acrylic expressions.  This would be their Large 'Love' Expressions.  I've also used a 6"x6" mascil by Clear Scraps titled Quarterfoil to add a bit of texture to my background.

Here's the sketch provided by Nadia that my page is based on.

I've cut the acrylic 'Love' in half in order to fit it onto my page.  I traced the letters onto patterned paper, cut them out and adhered the paper to my letters.  I wanted to accentuate the edges of my letters a bit more--so I went around all the edges with a white gel pen and then added a bit of shimmer by going along the edges with Star Dust Stickles.

The chipboard hearts & banner are by Imaginarium Designs.  To give the chippies thier texture, I've inked them in embossing ink & heat embossed them with gray embossing powder.  I tend to give my chippies a bit of glimmer.  So I decided to heat emboss my chippies again but this time with clear Star Dust Embossing Powder by Stampendous.  In person, these chippies have a fabulous shimmer!

The two center hearts shown in this screen shot I inked with Pumice Stone Distress Ink and then added a thick layer of Pewter Distress Stickles.

Aren't these little mushroom birds the cutest?  Wherever I find them, I tend to buy a few.  I love adding them as little embellies here n' there to my projects.

The light blue flowers are part of a Prima vine that I cut in half in order to place the flowers on both sides of my photos.

The pink organza star flower are items from my stash.  I have many of these in all colors & have recently decided to add them to my Etsy shop--so they're up for grabs if interested!

My journaling is stored in the tag shown here.  I added a bit of gray tulle to the tag.

I found these silver foil doilies that really add a nice 'silvery' touch to any projects that have a grayish tone in their color scheme.  This is the first time I had the chance to work with these silver foil doilies & I loved the effect they gave my page!

Here's a close up of the masking made with Clear Scraps Quarterfoil mascil.  I used Weathered Wood Distress ink & added a dot of Silver Stickles in between each design.

As always a big thanks to all of you who stop by for a visit.  Make sure you all stop by the OUAS blog to check out the other talented DT's take on this challenge.  Do play along if you can!  There are several fabulous prizes for some lucky winners.  Enjoy the rest of the week!
Photobucket

Saturday, February 2, 2013

A Mother's Love Layout

Greetings fellow scrappers!  It's time for another challenge over at Once Upon A...Sketch (OUAS)!  This month's challenge is 'love' & how appropriate since February is known for Valentine's Day & love of all kinds in many parts of the world.

As mentioned in the OUAS blog--love comes in many forms.  Love for your children, love for your parents, love for your significant other, the love shared between good friends...even the love you have for your pets!

Since I recently became a mom--I based my page on the love shared between a mother & her children.  I can finally say I truly understand my own mother & her never ending concern for me.  I'm 35 years old & she still worries about me when I go out late at night or when I'm late coming home from work.  I never understood exactly 'why' since I'm no longer a child myself.  However, with the birth of my son--it all just 'clicked'.  He's barely 3 months old but the need to protect him from harm, the fear that something may happen to him, the love I have for him has no age limits.  I truly do not see myself feeling any less worried for him even when he's 30 years old.  The love a parent has for their children truly is something quite strong, unbreakable & with no limits.

So here's my take on the challenge & on Nadia's fabulous sketch!
Here's Nadia's sketch & what I based my design on.
Journaling is stored in the tag seen inside the kraft envelope.  My journaling is meant for my son's eyes only.  I hope he'll enjoy reading all of these little messages I have for him within my pages!  I've been making many of these lately...

Several images by Prima were stamped onto transparencies with Staz On--cut them out and adhered them throughout my page.  In this screen shot you see a butterfly & gazebo.
These mini spools are some of my favorite embellies!  They really add just the right little touch to these pages.  I wrapped a bit of thread around them & linked the two spools with the same thread.

The "Wild Flowers" deep edge punch by Martha Stewart was used for the border seen in the background.  I further decorated the images of the punched border with glittered brads, Lavender Stickles & acrylic paint dots.

The base for my entire page is actually a 12" x 12" Acrylic Sheet by Clear Scraps.  The corrugated board seen in this screen shot is behind the acrylic base.  This card board can be removed & the page takes on a completely different look.

I also did a bit of hand stitching along the top & bottom borders.

The flowers are a combination of mulberry paper flowers & fabric flowers.  The fabric flowers I found at my local craft store in the clearance bin for $1.00.  What a great bargain & the color scheme was perfect for this page!


The large acrylic heart is also by Clear Scraps.  This would be the XL Hearts.

I punched a couple of holes into the bottom of the acrylic heart with my crop-a-dile & thread a bit of yellow & purple tulle through these holes.  The tulle peeks out from underneath the bird's nest.
The border of the acrylic heart was colored with alcohol inks.  I used a combination of Purple Twilight & Sunshine Yellow alcohol inks.  I then spread a bit of clear dry adhesive with a thin paint brush all along the edge of the heart  & sprinkled some Diamond Dust on it.  This was the end result.  I was going to leave the heart without the Diamond Dust--but I wanted the heart to stand out just a bit more without being too over bearing--so I decided to go with the Diamond Dust.
All of the ribbon used on this page was kindly sponsored by Scrapbook Fantasies.

In this screen shot, I adhered one dark purple ribbon on top of a wider sheer lilac ribbon.  I then adhered it to my page with a bit of a 'ruffle' to it to give it more dimension.

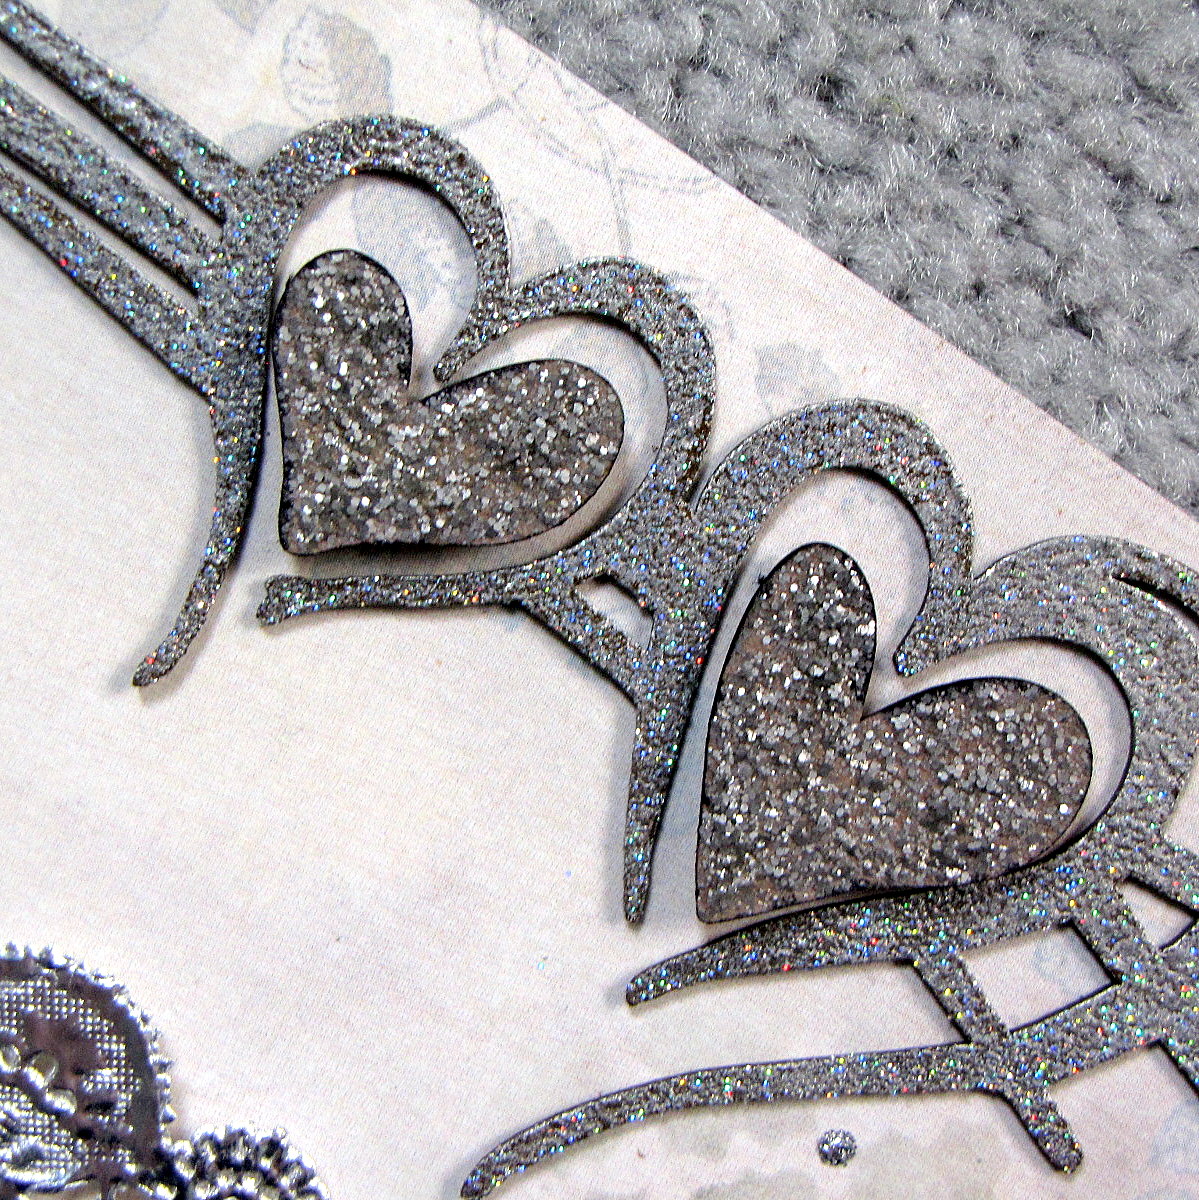
The title is by Dusty Attic.  I simply painted the chippie with  purple metallic acrylic paint.  In person, this title has a bit of a shimmer to it.
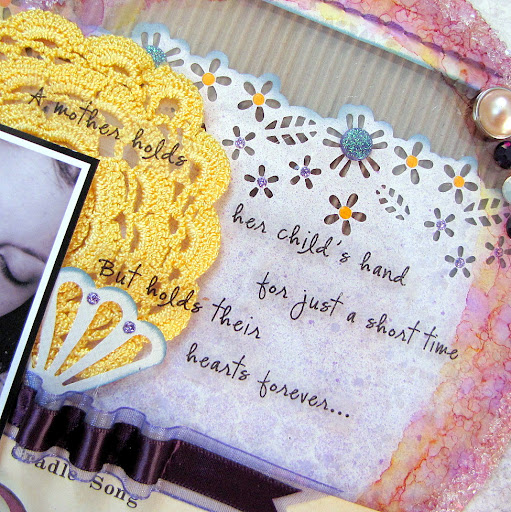
This quote that I found online was a perfect sentiment for my page.

"A mother holds her child's hand for just a short time.  But holds their hearts forever..."

I printed the quote onto a transparency, cut it out & adhered it to my page with a bit of clear dry adhesive.

As always, a big thank you to those who stop by for a visit.  Your visit & comments are always very much appreciated.

Make sure you stop by the OUAS blog and check out the other DT's take on this challenge--& do play along if you have the time!

Have a great rest of the week.
Photobucket

Saturday, December 15, 2012

Family Layout

Good evening fellow scrappers!  It's time for another Once Upon A Sketch (OUAS) reveal!  This month's theme was "It's December".  December is a month full of different celebrations based on culture & religion.  In my family, December is all about celebrating Christmas & in spending quality time with family.  For me though, it's all about the family.

I've also decided to submit this page to the December White Christmas challenge going on this month over at Berry71Bleu.

This particular Christmas will be extra special since our family has grown with the addition of my newborn son.  :-)  So I decided to scrap our very first 'family' Christmas photos.

I went with a white, blue & silver theme for my page.  I wanted to try a different holiday color palette other than your basic red & green.  I really liked the end result!

Here's the sketch provided to us by Nadia that my page is based on.
The title is an Expressions Clear Word Title--Family by Clear Scraps.

To give the title it's texture, I first highlighted the edges of the letters with a black Sharpie.  I then spread adhesive onto the letters & applied Diamond Dust.  Once dry I applied Stonewash & Silver alcohol inks directly onto the Diamond Dust.

In person, this technique gives off an amazing shimmer.  To see a more detailed tutorial on this technique, please go here.
The chipboard frame & border is by Imaginarium Designs.  The frame is called Four Circles Border With Lines. & the frame is called Swirly Frame 3" x 2".

For the chipboard--I painted them both with metallic periwinkle acrylic paint & then randomly applied acrylic Silver paint.  I further dressed up both chippies with dots of Opal White liquid pearls & on the border I applied a couple of clear rhinestones.
The silver leaves are by Prima.  The flowers consist of items from Prima & Manor House Creations in addition to mulberry, organza ribbon & jewel cabochon flowers from my stash.

As what has become a kind of tradition with me, my journaling is stored in the scroll.  Lately I've been thoroughly documenting the photos that I've been scrapping--my journaling is more like story telling lately!  A scroll allows me to tell a lot without taking too much space--so I've been using this technique on just about all my pages lately.  If interested in a tutorial on how I make these scrolls--you can find it here.
I got a bit messy with the background!  I first spritzed it with Anchor's Away Coloringz by Shimmerz.  I then applied gesso--I spread it heavily in certain areas.  In the areas where I heavily applied it I added beads, silver chunky leaf glitter by Martha Stewart & shaved ice by Stampendous.

Once everything dried...I applied a bit more Anchor's Away Coloringz & I was finally done!  Loved the texture all of this gave me!
Behind my photos is vellum that I manually ripped, inked the edges & then wrinkled up.  Wrinkling vellum & then unfolding it almost gives off this 'icy' effect which worked great for the theme of my page.
The large silver poinsettia is by Prima.  There's actually a bit of white tulle tucked underneath the poinsettia--but it's barely noticeable in the photo.  You can however, see the thin silver ribbon that I curled & also tucked behind my poinsettia.

Thanks to all of you who stop by for a visit.  Make sure to visit the OUAS blog & check out the other talented DT's take on this month's challenge--do play along if you can!

Enjoy the rest of your weekend!
Photobucket