HOMEABOUT MERESUMETUTORIALSMY FAVES

Tuesday, January 22, 2013

Live Laugh Love Layout

Hello again fellow scrappers!  Today I bring you my very first DT page for Berry71Bleu.

The Berry71Bleu challenge for January is to scrap yourself--the owner of Berry71Bleu--Marivic--described the challenge as scrapping the 'queen' within us.    Scrapping ourselves can be a bit intimidating for many scrappers--I've done several challenges in the past where the subject was ourselves & I'm constantly hearing how this seems to be a tough one for us.  As scrappers, we will consistently document those around us--but we will hardly ever take the time to scrap ourselves.

However, I'm one of those few that actually very much enjoys scrapping myself.  I feel that the most wonderful gift, memory & legacy that we can leave our loved ones behind or pass onto them is ourselves.  Who we are, what we represent.  Our likes & dislikes, our guilty pleasures.  What makes us happy--what makes us sad.  What are our beliefs?  What mottos do we live by?  What defines us?

This layout is me on paper.  I carefully hand picked embellishments that represent me in some shape or form.  The papers I used which is the "Frosted" collection by 13 Arts & who are also sponsoring the winner for this challenge--worked perfectly with my approach.
My background was made with the use of one of Clear Scraps newest releases called Mascils.  It's a mask & stencil all in one.  For this layout, I've used the 12" Numbers Mascil.  All I did was place the mascil against my paper & spritzed a bit of Granite Glimmer Mist & voila!  Instant shimmery background...

I randomly placed words onto my page that define me.  Here you'll see 'imagine' & 'spirit'.

I love butterflies & therefore included them on my page.  Those who know a little about me are aware that butterflies are my fave of embellishments.  They represent change--the start of something new.  They are also so very beautiful & graceful.

The cameo seen here was included because I consider myself an 'old soul'.  I enjoy classic black & white movies...give me a good Humphrey Bogart or Bette Davis movie & I'm good.  When it comes to music--my passion is jazz & swing...we're talking Glenn Miller, Billie Holiday, Etta James etc...sure I enjoy music from today as well--but late at night while scrapping, nothing puts me more at ease than listening to Billie Holiday sing about her latest heart break...
The light bulb speaks for itself.  'CREATE'!  Create indeed!! How I love to create...anything involving art is so very much me!  Not only do I love to create myself--but I also enjoy seeing works of art by others.  Once in a while I'll hop on a train & take a ride into NYC simply because I want to spend the day strolling through the Metropolitan museum.  To me, that's a great way to spend the day.
This tag is just one of many by Berry71Bleu.  They are made with much TLC by Marivic herself.  She made this one with the concept of the 'queen' within us all.  As little girls we are all princesses right?  Well those princesses grow up to be queens!  As women we are someone's daughter, sister, aunt, cousin, mom or grandmother.  We are unique in our own way & touch the lives of those around us simply by being us.

You can find more of Marivic's lovely tags in her Etsy shop here.
Flowers!  What woman doesn't love flowers eh?  Well, I'm no exception...I love them & include them in just about all my work.  I also love the real thing & have a garden full of different flowers that I enjoy tending to--not to mention all the plants that I have inside my home--my home is my little jungle full of plants!  :-)

These bold flowers are actually stamps.  These are the 'Organic Fabric Flourish' stamps by Inkadinkado.  I stamped the images onto a transparency with black Staz On--cut the images out & then adhered them onto my page with clear dry adhesive.  Stamping images onto a transparency ensures that you can place your images anywhere on your page.
Birds is another pleasure of mine.   But I especially love & admire the wise owl.  Therefore, I have him perched right next to me.

The pen nib is there because I love to write.  I started writing short stories when I was in high school simply because I just felt like writing!  I got ideas in my head & put them to paper.  I still tend to write now-a-days although not as much as I'd like since I hardly ever find the time.  But I do enjoy it...

This tag that is part of the 13 Arts "Frosted" collection begged to be included on this page.  It's exactly what I believe in.  Life is indeed so very beautiful--look around, take it in--live, love & just be happy!

I included the 'smile' because those that are close to me know that I'm just a big goofy clown that consistently loves to laugh & is always looking to make others laugh as well.  Laughter is the cure for many things...hey--according to some doctors, laughing even helps you lose weight!  lol  I think we burn about 3 calories with every good hearty laugh.  So laugh it up guys!!

Thanks for visiting!  Do take the time to stop by the Berry71Bleu blog & participate in this month's challenge.  Document something about yourself that you'd enjoy passing down to your loved ones--they'll appreciate it more than you'll ever know...

Photobucket

Saturday, January 19, 2013

Recipe For Making Love Layout

Hello fellow scrappers!  With Valentines Day just around the corner (can you believe it?) I'm digging out my wedding photos and/or re-doing wedding pages that I've done in the past & just wasn't 100% happy with.  This one is actually a re-do.

The current challenge going on over at Colors...Stories...Inspiration (C.S.I) triggered this re-do. I found the color palette to be just right for this page.

So here is me & my hubby over 5 years ago on our wedding day.  Yes, it's been 5 years already!  I know for those of you who have been married 10, 15 or 20+ years 5 is probably not such a biggie.  However, I'm more surprised not by the number but by how fast these 5 years have flown by!  It just feels like yesterday that we were exchanging vows & here we are going on our 6th year together.  I'm sure pretty soon I'll be talking about our 10th anniversary--sigh...tick tock tick tock...

Here's the C.S.I challenge I based my page on.

For my evidence I have: tickets, swirls & music pattern

For my testimony I've used the song title & lyrics from a song

I've also based my design on the provided sketch.
The 'Love' part of the title is an Acrylic Expression by Clear Scraps.  I kept the texture of the title simple.  All I did was highlight the edges of the letters with a red Sharpie Oil based Paint pen.  This gave my title the simple & perfect effect I wanted.
The Love tickets are by Tim Holtz.  The lyrics are from Harry Connick Jr.'s song "Recipe For Making Love"--which is also the title for my layout.

We also played this song at our wedding:  A little bit of me & a whole lot of you.  Add a dash of starlight & a dozen roses too.  Then let it rise for a hundred years or two.  And that's the recipe for making love.

We found this to be a very cute song to be part of our wedding--it also helps that I'm a huge jazz fan!  :-)

The light blue pearl string I've had in my stash for ages.  In fact I have various pearl strings in my stash that I really need to use up. So you'll be seeing these trims on several of my projects.
The little glass vial is filled with tiny little red hearts that I had in my stash.  I knew those little hearts would come in handy one day!

The large handmade flower I bought from an Etsy store called More Paper Than Shoes.  Anna the owner, creates various handmade flowers that add a perfect touch to layouts, projects & even weddings!

The little paper rolls are just scraps of left over patterned paper from other projects that I've rolled up & glued to my page.
The floral frame that surrounds my photos is actually a stamp.  It's the large cameo frame stamp by Stampendous.  The stamp itself is much smaller than what you see here--however you can make any stamp to be any size for your needs with the use of a scanner.  So if you have a scanner at home--just do the following.

TIP: If you have a stamp that you wish to use on your project but it's too small or too big--stamp the image with black ink onto a sheet of plain white card stock.  I use Staz On for this step because Staz On tends to provide a very sharp stamped image. Scan your image & import the image to your computer.  Then with a photo/image editing tool like Photoshop or even Picasa resize your image to the size you need.  Then just print the image out & you're done!  For my page, I needed the frame to be transparent.  So I printed it onto a printable transparency sheet--cut the image out & then adhered it to my page.  Voila!  Instant frame!

The wedding couple I cut out from my original take on this page.  I decided to keep this image from my original page & use it here.  You can also see how much my scrapping style has evolved through the years.

I've created the veil for the bride by adhering a bit of black tulle to a decorative brad & then attaching it to her head.

Thanks for stopping by & enjoy the rest of the week!
Photobucket

Thursday, January 17, 2013

My Promise Layout

Hello once again fellow scrappers!  Today I bring you a page I made with a couple of new releases by Clear Scraps.  I kept the design of this page fairly simple by utilizing white space & letting the elements of the page shine through.

This would be my newborn son when he was about 2 days old.  It's amazing how they change from when they're first born.  He's currently a little over 2 months & I can't say he looks the same as in this picture.

The theme of my page is 'My Promise' to him as his mom.  My journaling consists of items that I pledge to provide as his mom throughout his life time & as one of the main influential persons in his life.  The journaling is meant for his eyes only.  Once he's old enough to comprehend I'll let him read it.  Maybe by then he'll also let me know if I'm keeping some of my promises or not!  :-)

Here is a sample of one of Clear Scraps brand new releases--Acrylic Borders.  I used the Square Acrylic Border on this page.

To give the border it's texture, I first highlighted the edges of a couple of the squares with a black Sharpie.  I then painted the border with orange & yellow alcohol inks.  Finally, I dressed up the squares by adding dots of Bisque Liquid Pearls on the corners of each square.  A couple of mosaic pieces (some by Prima some from my own stash) were adhered to a few of the square boxes.
This lovely large flower is by Manor House Creations.
I'm loving these very cute velvet teddy bears that I found at my local craft store A.C. Moore.  They're perfect for baby/children themed pages!

For my background I sprayed a couple of quick bursts of RipTide glimmer mist & randomly added dots of Star Dust Stickles.
This square frame is also part of a new release by Clear Scraps--the 'Clearly Framed' collection.  I've used the Small Rectangle Frame which I've covered with patterned paper, inked the edges with Vintage Photo distress ink & dressed up the corners with a couple of Black Diamond Stickles dots.  A small corner from a paper white doily was cut & adhered to the inside of the frame.
I've tucked a bit of light blue & yellow tulle underneath the large Manor House flower.  I feel that tulle tends to add a soft & delicate touch to a page.
Here's the bottom half of the Square Acrylic Border.  You just can't go wrong with alcohol inks when it comes to acrylic--it adds a fabulous texture to it!

As usual, a big thank you to all of you who stop by for a visit.

Enjoy the rest of the week!
Photobucket

Wednesday, December 26, 2012

My Greatest Gift Layout

Good evening fellow scrappers!  For those of you that celebrate it--I hope you had a very Merry Christmas alongside your family/loved ones!

I had a peaceful one at home with my parents, husband, our furry son Toby & newborn son.  This was a special Christmas for us all since my husband & I were celebrating it alongside our first child & for my parents their very first grandchild.  :-)

So when I read about the latest challenge going on over at Colors...Stories...Inspiration (C.S.I)--I decided to set some time aside to play along.  One of the journaling Christmas prompts instantly grabbed me which was 'What was the best Christmas gift you ever received?' Well for me, it's been my son--so I based this page on him.

Here's the case this challenge is based on.

For my evidence I used: snowflakes, beads, texture paste, something shiny & puffy paint.

For my testimony I used: Xmas prompts--the best Christmas gift you ever received.
This pink flower is handmade.  I made it by using the Carnation tutorial that I did a while back.  If interested in this tutorial--please go here.
As usual, I had a story to tell with this page--a lengthy one!  So I stored it in a scroll which has become my fave way of storing my journaling.  I have a brief tutorial on this as well.  If interested, you can find a tutorial for these journaling scrolls here.
Most of these flowers are from my stash.  The large turquoise fabric flower was plain--I added the gold glitter with Stickles to some of it's petals to match the Prima turquoise poinsettia in the upper left hand corner.
As previously mentioned, this poinsettia is by Prima.

The large snowflakes used on this page I bought at my local Target.  Every year for Christmas they stock these in all colors.  They are meant for Christmas trees but they also work wonderfully for Christmas or Winter themed scrapbook pages.  They come in packs of 4 for $1.00.  Sold!

The background was made by using a combination of splatter stamps, glimmer mist & Shimmerz.  I used the Splats stamp set by Recollections & a grungy splatter stamp by Vilda Stamps. I randomly spritzed the background with Riptide glimmer mist & Cotton Candy Spritz.
Here's my smallest winter tree--both flowers seen here are from my crafty stash.
Here are my two larger chipboard winter trees.  These chippies are by Dusty Attic.

I gave these trees a lot of texture by using several techniques & mixed media.  You can find a tutorial on these trees here if interested.

Thanks to all of you who stop by for a visit--as always...it's greatly appreciated!

Enjoy the rest of the week, have a wonderful New Year & I'll be back in 2013!
Photobucket

Mixed Media Chipboard Winter Trees Tutorial

Hello fellow crafters!  I put together this tutorial to show how I added texture to these Dusty Attic chippie trees found on my 'My Greatest Gift' page.

Let's get started!

Wednesday, December 19, 2012

Christmas 2012 Layout

Hello once again fellow bloggers & scrappers!  Tick tock, tick tock...Christmas is just around the corner!  I still can't believe how fast this year flew by.  Would you believe that I have YET to do some Christmas shopping?  I'm so very much trying to avoid going either the day before Christmas Eve or right on Christmas Eve--but at the rate I'm going--it's looking like I'm heading in that direction--tsk, tsk, tsk...
This week Clear Scraps teamed up with Authentique for a project inspiration blog hop.  Both DT's have created some amazing projects with products from both of these innovative companies.  Today, it's my turn to present my project.

I was given the "Peaceful" collection by Authentique to work with.  This turned out to be perfect timing since we have recently taken our yearly Christmas photo.  I don't usually find the time to scrap my Christmas photos till July!  So am happy to have gotten an early start this time.
Some good ol' fashioned paper tearing & rolling was used on this page.  Here you can see the tearing I did in the upper left hand corner.  I manually tore the papers at an angle.  I then inked the edges with brown chalk ink & with my fingers ripped, wrinkled & curled my paper.

The cute little bird I cut out from the "Solitude" paper that is part of the Peaceful collection.
I'm in love with these cute little mini gift boxes.  I found them at my local craft store Michaels in the mini ornament area.  They're perfect for mini trees & even better for scrapbook pages!
This large acrylic snowflake is of course by Clear Scraps.  It's actually a page from their Snowflake Mini Album.  The pages from these little albums can also be used as embellishments as you can see here.

To see how I gave the snowflake it's texture, feel free to see the tutorial here.

Here's my other snowflake.  I have this one peeking out from underneath my cluster of embellishments.
I randomly applied dots of Xmas Red, Lime Green & Star Dust Stickles to my background.
A big thanks to all of you who stop by for a visit.  Make sure to check out the other DT projects on both the Clear Scraps & Authentique blogs.  They'll be going up all week long!

Enjoy the rest of the week!
Photobucket

Diamond Dust & Acrylic Tutorial

This tutorial explains how Diamond Dust can be used to give your acrylic embellishments some fabulous texture.  In addition to the Diamond Dust you can add a bit more visual interest to your embellishments with either acrylic paints or alcohol inks.

So let's get started first with the acrylic snowflake found on my "Christmas 2012" page.

Saturday, December 15, 2012

Family Layout

Good evening fellow scrappers!  It's time for another Once Upon A Sketch (OUAS) reveal!  This month's theme was "It's December".  December is a month full of different celebrations based on culture & religion.  In my family, December is all about celebrating Christmas & in spending quality time with family.  For me though, it's all about the family.

I've also decided to submit this page to the December White Christmas challenge going on this month over at Berry71Bleu.

This particular Christmas will be extra special since our family has grown with the addition of my newborn son.  :-)  So I decided to scrap our very first 'family' Christmas photos.

I went with a white, blue & silver theme for my page.  I wanted to try a different holiday color palette other than your basic red & green.  I really liked the end result!

Here's the sketch provided to us by Nadia that my page is based on.
The title is an Expressions Clear Word Title--Family by Clear Scraps.

To give the title it's texture, I first highlighted the edges of the letters with a black Sharpie.  I then spread adhesive onto the letters & applied Diamond Dust.  Once dry I applied Stonewash & Silver alcohol inks directly onto the Diamond Dust.

In person, this technique gives off an amazing shimmer.  To see a more detailed tutorial on this technique, please go here.
The chipboard frame & border is by Imaginarium Designs.  The frame is called Four Circles Border With Lines. & the frame is called Swirly Frame 3" x 2".

For the chipboard--I painted them both with metallic periwinkle acrylic paint & then randomly applied acrylic Silver paint.  I further dressed up both chippies with dots of Opal White liquid pearls & on the border I applied a couple of clear rhinestones.
The silver leaves are by Prima.  The flowers consist of items from Prima & Manor House Creations in addition to mulberry, organza ribbon & jewel cabochon flowers from my stash.

As what has become a kind of tradition with me, my journaling is stored in the scroll.  Lately I've been thoroughly documenting the photos that I've been scrapping--my journaling is more like story telling lately!  A scroll allows me to tell a lot without taking too much space--so I've been using this technique on just about all my pages lately.  If interested in a tutorial on how I make these scrolls--you can find it here.
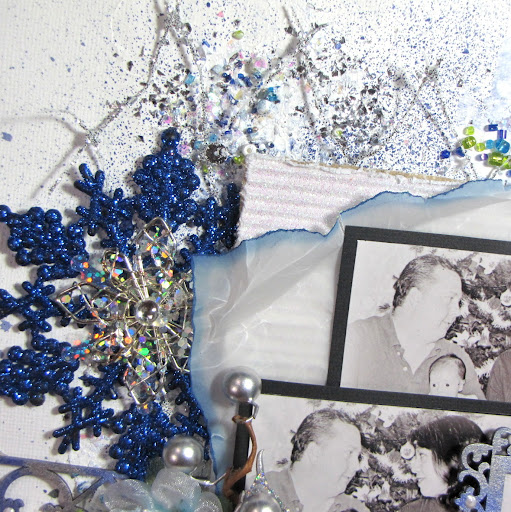
I got a bit messy with the background!  I first spritzed it with Anchor's Away Coloringz by Shimmerz.  I then applied gesso--I spread it heavily in certain areas.  In the areas where I heavily applied it I added beads, silver chunky leaf glitter by Martha Stewart & shaved ice by Stampendous.

Once everything dried...I applied a bit more Anchor's Away Coloringz & I was finally done!  Loved the texture all of this gave me!
Behind my photos is vellum that I manually ripped, inked the edges & then wrinkled up.  Wrinkling vellum & then unfolding it almost gives off this 'icy' effect which worked great for the theme of my page.
The large silver poinsettia is by Prima.  There's actually a bit of white tulle tucked underneath the poinsettia--but it's barely noticeable in the photo.  You can however, see the thin silver ribbon that I curled & also tucked behind my poinsettia.

Thanks to all of you who stop by for a visit.  Make sure to visit the OUAS blog & check out the other talented DT's take on this month's challenge--do play along if you can!

Enjoy the rest of your weekend!
Photobucket